


Replacing a cracked side view mirror glass is a simple DIY project. But it's important to have the correct replacement mirror before starting.
Introduction
Replacing a cracked side view mirror glass is a simple DIY project. But it's important to have the correct replacement mirror before starting.
Nothing is more frustrating than finding the side-view mirror glass on your car or truck cracked or shattered. Side-view mirrors are an important safety feature. In my state of Pennsylvania, and as a 50-year certified PennDOT Safety Inspection Mechanic, a vehicle cannot pass an annual safety inspection if they are “cracked, broken or discolored.”
With the arrival of ADAS (Advanced Driver Assistance Systems) and other innovative safety features, replacing a cracked side view mirror glass has become a little more challenging. Locating the proper mirror glass and installing it yourself can save you several hundred dollars over installing an entire side view mirror assembly. Precut glass mirrors are available for many different makes and models.
Ahead, you’ll find simple tips from an experienced auto collision repair expert on safely replacing a side-view mirror glass.
Tools Required
- Leather or heavy duty work gloves
- Needle nose pliers (optional)
- Plastic trim removal tools (optional)
- Safety glasses
- Screwdriver
- Small metal pick (optional)
- Stiff 1 in. putty knife
Materials Required
- Auto glass cleaner
- Black rubber/silicone sealant adhesive
- Denatured alcohol (optional)
- Microfiber cloth
- Painter's tape
- Piece of cardboard or heavy paper bag
- Precut or direct fit mirror glass
- Sandpaper or safety razor blade scrapper
Project step-by-step (6)
Step 1
Gather All Tools and Materials
Before starting, ASE-certified auto collision repair expert Bob Hunter explained you’ll first need to determine if your vehicle’s outside side view mirrors have any of these functions:
- Automatic dimming
- Blind side alert lights
- Convex mirrors with “Objects In Mirror Are Closer Than They Appear” warning
- Heated/defrosting
- Lane change alert lights
- Turn signal indicators
Hunter also mentioned there are “three different types” of replacement mirror glass:
- Traditional, no frills, flat outside view mirror glass
- Mirrors with electric components and features listed above
- Mirrors attached to a case and then mounted to the mirror housing with clips or other fasteners
- Not all vehicles will have replacement outside view mirror glass
Once you have this information and have purchased the correct mirror glass for your vehicle, it’s time to get started.
Step 2
Traditional Side-View Mirrors
Traditional, no frills, flat outside view mirror glass are the least expensive and easiest replacement mirror glass to install.
Prep the mirror base
- Put on your heavy-duty work gloves and safety glasses.
- Place cardboard or a heavy paper bag under the mirror to catch any broken glass.
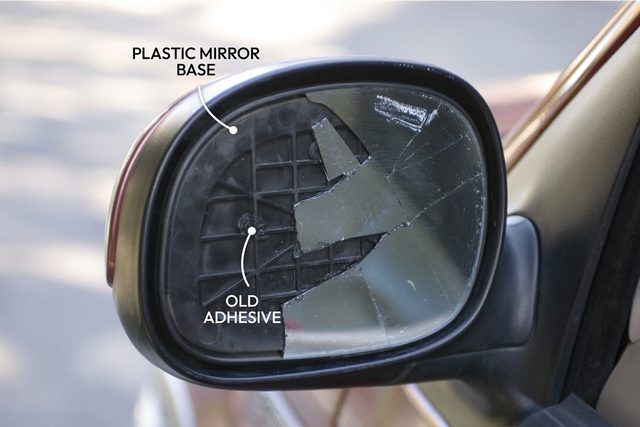
- Using the putty knife, pick away as many loose pieces of the broken mirror as possible from the normal black plastic mirror mounting base surface.
- Thoroughly remove all of the remaining glass.
- Hunter recommends using a “[stiff] putty knife, sandpaper or small pick” to completely remove any remaining adhesive. He explained “the (mirror) base has small groves.” These provide extra space for additional adhesive to better secure the mirror.”
- Wipe the base surface with denatured alcohol and allow to fully dry.
Apply sealant
Even if the new glass comes with adhesive strips on the back, don’t rely on those strips alone to keep the glass in place.
- Clean the new glass with an auto glass cleaner.
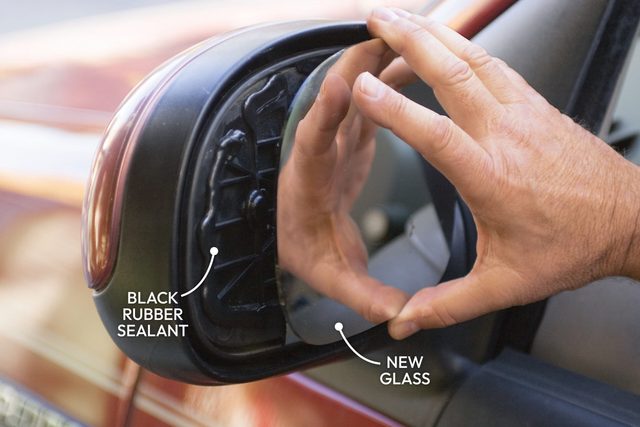
- Carefully apply a thick 1/4. in. bead of black rubber/silicone sealant 3/4 inches in from the perimeter of the plastic mirror base.
- Place a few large dollops of the sealant on the honeycomb portion of the plastic base.
- Don’t apply the sealant in areas where the adhesive pads will contact the plastic base. The pads must make contact with the plastic base to hold the new glass in place while the sealant sets up.
Install the new glass
- Gently press the new mirror glass onto the base and into place.
- Use painters tape to hold the mirror in place until the sealant cures.
- Carefully remove any excess sealant that may have oozed out once fully cured.
Step 3
Mirrors With Electric Components
Prep the mirror base
These mirrors can be more expensive to purchase and a little tricky to install, but DIY-ing can save you a chunk of cash.
- Put on leather or heavy-duty gloves and safety glasses.
- Place cardboard or a heavy paper bag under the mirror to catch any broken glass.
- Using a plastic trim removal tool (recommended) or screwdriver, carefully pry the mirror—usually attached to a metal or plastic backing retainer—out of the mirror assembly. The mirror should not be held in with any adhesive and will “pop out” of the mirror assembly/housing.
- Note the position of the mirror glass and any wires attached to it. If possible, take a snapshot with your cell phone.
- Using either your fingers, needle nose pliers, screwdriver or mall metal pick, carefully remove all electrical connectors.
Install the mirror glass
- Clean the new glass with an auto glass cleaner.
- Reconnect all electrical connectors. Ensure that they are attached to the correct terminals.
- Carefully insert the mirror glass in the appropriate orientation into the mirror housing assembly retainer bracket.
- Line up the mirror retainer, attaching clips with the retainer bracket’s mounting holes.
- Using the palms or fingers of both hands, apply light but moderate pressure to the face and sides of the new mirror glass.
- Keep constant pressure on and push the mirror glass until it “snaps” into place.
- Tug on the glass to ensure it is fully seated and snugly fits in its mounting bracket before driving.
Step 4
Replacing a Side-View Mirror With a Damaged Case
If the mirror housing assembly retainer bracket (or mirror case or mirror housing assembly case) is damaged and needs to be replaced, you may have to get those painted to match, but it’s still a cost-saving DIY repair.
Prep the case and mirror base
- Put on leather or heavy-duty gloves and safety glasses.
- Place cardboard or a heavy paper bag under the mirror to catch any broken glass.
- Using a plastic trim removal tool or screwdriver, carefully pry the mirror—usually attached to a solid-backed retainer—out of the mirror assembly. The mirror should not be held in with any adhesive and will “pop out” of the mirror assembly/housing.
- If your vehicle has electric components, carefully remove all electrical connectors using your fingers, needle-nose pliers, screwdriver or small metal pick.
- Note the position of the mirror and any wires that are attached to it. Use your cell phone to take a snapshot if possible.
- Remove fasteners (clips, screws, plastic rivets, etc.) from inside the mirror assembly/housing holding the mirror case in place.
- Carefully pull the case away from the assembly/housing.
- NOTE: Some vehicles may have clips on the opposite side of the assembly/housing securing it to the housing. In this situation, it may take a little more effort to separate the case from the assembly/housing.
Install the new mirror case and glass
- Paint, or have the new case painted, if necessary, to match your vehicle’s color. The new case should come with new fasteners.
- Let the paint dry for at least 48 hours.
- Line up the case’s fasteners with the assembly/housing mounting holes.
- Push on the case until it “pops” securely into place.
- Clean the new glass with auto glass cleaner.
- Reconnect all electrical connectors. Take care that they are attached to the correct terminals.
- Carefully insert the mirror glass in the appropriate orientation into the new mirror housing/assembly.
- Line up the mirror retainer attaching clips with the retainer bracket’s mounting holes.
- Using the palms or fingers of both hands, apply light, but moderate pressure to the face and sides of the new mirror glass.
- Keep constant pressure on and keep pushing the mirror glass until it “snaps” into place.
- Tug on the glass to ensure it is fully seated and snugly fits in its mounting bracket before driving

Step 5
FAQ
What are the signs you need to replace your side view mirror glass?
- Any problems with a mirror that impair visibility indicate you may need to replace your side view mirror glass now:
- Without being obvious, if it’s cracked or shattered.
- Flaking, peeling or distorted from water damage.
- Milky or discolored.
- Scratched glass or loose retainer.
What happens if a replacement mirror glass with electric components is not available?
You can always replace the glass with a plain mirror. You may have to have it custom cut, but that should not be expensive, and it’s better and safer than having no mirror at all.
Step 6
Meet the Expert
Bob Hunter has more than 30 years of experience as an autobody and painting technician. He is an ASE Master and I-CAR ProLevel Technician, and currently is a Pennsylvania Department of Education certified Auto Collision instructor at North Montco Technical Career Center in Lansdale, PA. During summer break, Bob works in automotive restoration and has restored classic cars that have sold at Barret-Jackson Auctions.
Resources
- Pennsylvania Department of Transportation (PennDOT): Vehicle Equipment and Inspection Regulations (2020) Oct. 21, 2024
- CARiD: “What You Need To Know When Ordering A Replacement Outside Mirror” Oct. 20, 2024
- Dorman Products: “Plastic Backed Door Mirror Glass” Oct. 20, 2024
- GMPartsCenter: “Heated outside replacement mirror glass” Oct. 20, 2024
Possible Getty Images:
Shows retainer bracket Broken Exterior Rearview Mirror High-Res Stock Photo – Getty Images
Shows fractured mirror Damaged Sideview Mirror On A Auto Vehicle High-Res Stock Photo – Getty Images
Show mirror with “Objects In Mirror Are Closer Than They Appear” Closeup Of Car Mirror Objects Are Closer Than They Appear High-Res Stock Photo – Getty Images