


Breathe new life into your laminate countertops without suffering through a pricey replacement—resurface them instead!
Two days
Beginner
$101–250
Introduction
Want to give your kitchen counters a facelift, but dread the expense and hassle that comes with tearing out the old and installing brand-new countertops? If your laminate kitchen countertops are worn and dated but still structurally sound, there's another option to consider: a countertop coating resurface.
A countertop coating system is a simple way to transform worn or damaged laminate countertops into a new countertop surface. These products are available in a range of colors and accent chips. If you've got some basic DIY painting skills, this is a two-day project you can absolutely handle!
Our installers used Rust-Oleum's Countertop Transformations, but there are other options on the market, from manufacturers such as Beyond Paint. Typically, these systems have clear instructions, and the kit comes with everything you need except basic painting tools.
Countertop transformation kits can be applied to any laminate or hardwood countertop in reasonable condition. A few burns and scratches are fine, but you'll need to fill any deep dents or chips before painting. And countertop refinishing systems aren't limited to kitchens. They're also great for bathroom vanity tops and workshop work surfaces.
"Products like Rust-Oleum Countertop Transformation are excellent for giving laminate countertops a new look without a full replacement," says Jason Tierney of Bathroom Renovations Oshawa. "These kits often include everything needed for a professional-looking finish."
While there are other ways to refresh a countertop, Joshua Parrish of PRI Construction prefers solid surfaces. "I would not recommend tiling a countertop," he says, "due to the potential of grout holding bacteria." When selecting a countertop refinishing system, be sure to err on the side of surplus when making a purchase. You're much better off having a little too much material than not enough. Parrish advises you "always double-check your measurements."
Our Family Handyman installers reported a surprisingly easy installation and almost-instant toughness. In fact, when they attempted to scratch the newly resurfaced countertop with car keys, they found it left no marks at all. I have first-hand experience with a countertop refinished with Rust-Oleum Countertop Transformations, and can confirm that it's still going strong even after a full decade of use. At that age, the countertop does have some chips and dings, but they're almost invisible against the charcoal coloring.
While this isn't a technically challenging project, there are multiple steps that are time sensitive. We strongly recommend that you have a two-person team for any countertops over six feet in length.
Tools Required
- 6-in. roller (microfiber recommended)
- Dust mask
- Orbital sander (optional)
- Paintbrush
- Putty knife
- Rubber gloves
- Safety glasses
- Shop vacuum
Materials Required
- 120-grit sandpaper
- Cardboard or cloth tarp
- Coating system
- Painter's tape
- Plastic drop cloth
Project step-by-step (5)
Step 1
Sand and prep the surface
The first step is to degloss the laminate surface so that the paint can adhere properly. Depending on your kit, sanding tools may be provided, or you may need to supply your own.
- Mask off base cabinets, the sink, appliances, and the walls above the backsplash with painter’s tape and plastic. You can also use plastic on the floor, but that can be slick. Laying down cardboard or a tarp is preferable.
- Cover the sink drains so nothing falls into them.
- Use the sanding pad provided with the kit to hand sand the surfaces.
- To reduce sanding time, use an orbital sander with 60- or 80-grit sandpaper on the flat areas.
- There is a slight trade-off, as you’ll add cleaning time to vacuum the dust.
- Use a light touch so you don’t sand through any areas or create uneven surfaces.
- You’ll know it’s deglossed when there are tiny scratches everywhere.
- Vacuum the dust and wipe all surfaces with a damp cloth until they’re completely dust-free.
Step 2
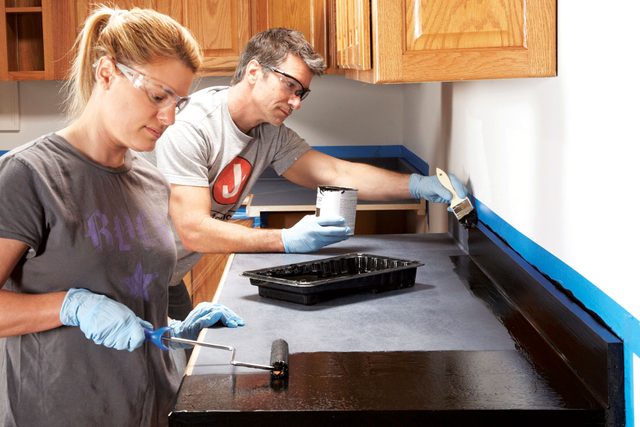
Apply the base coat
The base coat serves as both a background color and as a sticky bed to hold the accent chips. Note that this step is time-sensitive! Once you’ve applied the base coat, you’ll have about 20 minutes to apply the decorative chips before it dries.
- Make sure you don’t run into problems with the time constraint by planning ahead.
- Before you apply the base coat, place the decorative chips in the chip dispenser and keep it close to hand.
- Have a long countertop or several countertop areas? Either work with a helper or work on a manageable section at a time.
- If working in sections, apply the base coat and chips before moving on to the next section. You can usually apply the topcoat to multiple areas in one go.
- Now we’re ready to lay down the base coat!
- Apply the base coat using a brush on the backsplash and a microfiber roller on the flat surface and front edge.
- Lay the base coat thick and evenly, and maintain a wet edge on the entire surface.
- The kit includes a wetting agent to spray on to keep the base coat moist and ready for the decorative chips.
- Rust-Oleum suggests using a humidifier in particularly arid environments to aid in working time.
Step 3
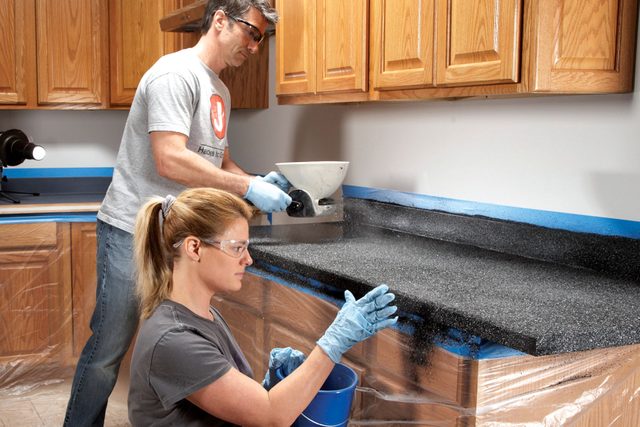
Apply the decorative chips
The multicolored chips hide brush marks and give the countertop a textured, speckled appearance. Remember, this step needs to be done within about 20 minutes of applying the base coat.
- Moving quickly, use the dispenser to broadcast the decorative chips so they completely cover the backsplash, flat area and front edges of the counter.
- Don’t skimp! The kit comes with a ton of chips, so use more than you need to cover every bit of the base coat.
- When applying chips to the front edge, our installers found that it was most effective to get on their knees, bring them eye-level to the countertop edge, and throw the chips into the front edge by hand rather than using the dispenser.
- Inspect for any areas of uncovered base coat, and apply more chips as needed.
- Watch for sections with poor chip adhesion or find that chips were removed by accidental contact.
- According to the Rust-Oleum site, dip a sponge into the base coat paint and lightly dab new material on the damaged area. Then, immediately cover the area with decorative chips.
- Watch for sections with poor chip adhesion or find that chips were removed by accidental contact.
- Let the counter dry undisturbed. Follow the manufacturer’s recommendation— the system we used specified a minimum of 12 hours but no more than 24.
Step 4
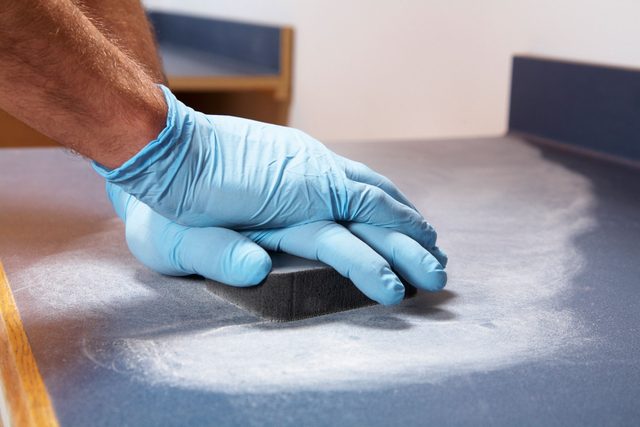
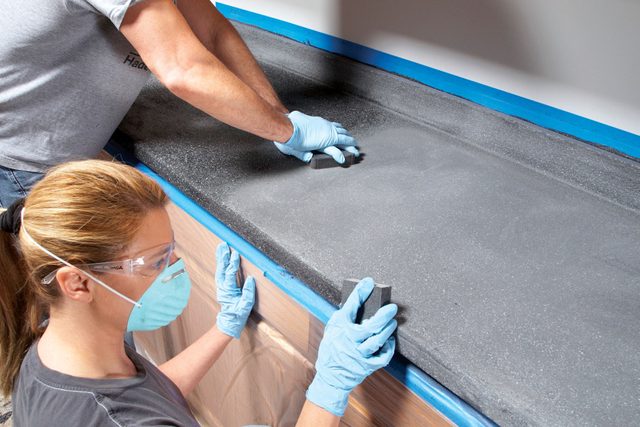
Sand and smooth
On day two, it’s time to sand the rough chip surfaces smooth to prepare them for the topcoat.
- After the base coat is dry, go over the surface with a vacuum to lift away any loose chips. Seeing them with your bare eyes is hard, so a vacuum is a big time saver.
- Knock down the rough chip edges using the enclosed scraper.
- Use a light touch! You don’t want to gouge the surface.
- Switch to a sanding block or pad, and sand the counter.
- Use a lighter touch on the backsplash and front edges, where there are likely to be fewer chips on the surface.
- Sand harder on the flat surfaces.
- A common question is how to know when to stop sanding.
- The kit includes a sample of how smooth the countertop should be.
- The challenge is to sand it smooth without sanding through the chips.
- Note that the sanding process will appear to lighten the chip surface, but the topcoat will darken it again.
- Vacuum again to clean away the new layer of dust.
- Make a very light last pass with 120-grit sandpaper for extra smoothness.
- Vacuum and wipe clean with a damp cloth until all the sanding dust has been removed.
Step 5
Apply the topcoat
The clear topcoat sealer is a two-part formula. Once you’ve mixed it, you must use it before it cures. (The kit we used gave the topcoat a 4-hour install time.)
- Mix the sealer per the included instructions.
- Use a paintbrush to apply a thick layer of topcoat to the backsplash and along the countertop/backsplash border.
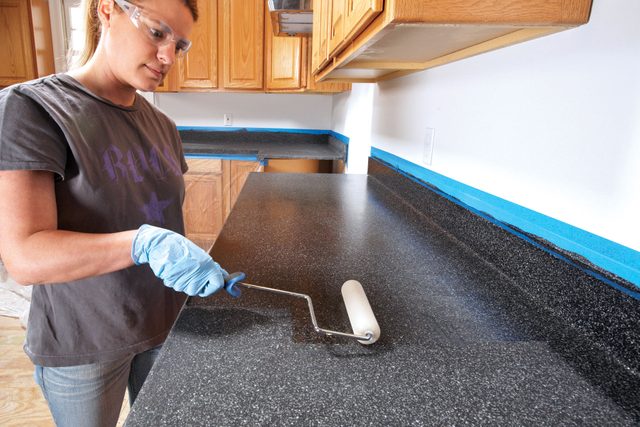
- Use a 6-in. high-density roller to apply a thick, even layer of the topcoat onto the flat counter area and the front edge.
- Once every surface is covered, go back and roll a final pass of the topcoat in one direction to avoid lap and brush marks.
- The top coat will dry to the touch in about four to six hours. Once it’s touch-dry, remove the tape and plastic.
- The countertop will be ready for light use in 48 hours and completely cured within a week.
-
- Rust-Oleum defines “light use” as setting items 5 lbs or less on the surface and doing light food prep. Avoid running items that expose the counter-top to high heat (such as dishwashers and toaster ovens).
- After 48 hours, you’re clear to caulk as needed. Joshua Parrish recommends 100% silicone caulk for kitchen counter applications.
-
About the Experts
- Joshua Parrish is a licensed general contractor with nearly a decade of experience in home renovations, property flips and new construction. He is the owner of PRI Construction Co., and the co-owner of the Hammer and Handsaw blog, which features home improvement tips, property flip stories, DIY projects and more.
- Jason Tierney is the owner and founder of Bathroom Renovations Oshawa. With extensive experience in renovating and updating bathroom surfaces, including laminate countertops, the Bathroom Renovations Oshawa team is skilled in applying various techniques to enhance the appearance of existing materials.