


Build this raised dog feeder so the Fido in your life can eat their daily kibble in style.
A few hours
Beginner
$20-50
Introduction
This raised dog feeder is simple to make, offers a sleek modern look and only costs around $30 in materials. With minimal tools and one six-foot board of whatever wood species your dog likes best, you can put this together in just a few hours.
Cutting List
| Part | Part Name | QTY | Dimension |
| A | Feeder top | 1 | 11-1/4” x 24” |
| B | Feeder bottom | 1 | 11-1/4” x 24” |
| C | Feeder sides | 2 | 11-1/4” x 6 ½” |

Tools Required
- Circular saw
- Drill
- Jig Saw
- Orbital sander
Materials Required
- 1-1/4" Screws
- 1x12 board
- 8” dog food bowls
- Glue
Project step-by-step (7)
Step 1
Divide the Top and Mark the Centers
After cutting the top, bottom and sides from a 1×12 board, draw a line across the middle of what will be the top. This divides the board in half and leaves you with two equal rectangular shapes. Find the center of each by making an ‘X’ from the corners.

Step 2
Find the Bowl’s Radius
With a ruler, measure the diameter of the bowl. I found it easiest to measure the diameter including the lip, divide that by two and subtract the size of the lip. This bowl had an 8-1/2-in diameter. The total radius is 4-1/4-in. Subtracting 1/4-in. for the lip gives me a radius of four inches.
Math refresher: The diameter is a line through the center between two points on the outside. The radius runs from the center to a point on the outside.

Step 3
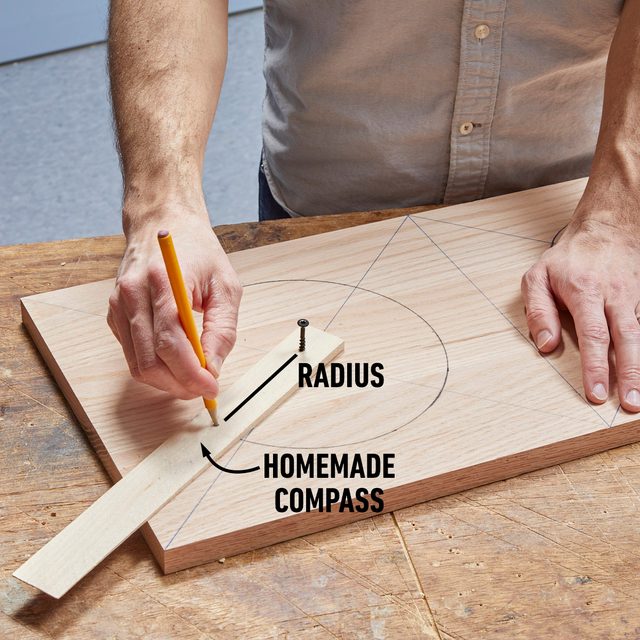
Make a Compass to Draw the Circles
Take a piece of scrap wood (I used a shim) and drive a screw or nail through one end. Measure and mark the radius of the bowl from the tip of the screw and drill a hole big enough to fit a pencil. Place the tip of the screw on the center of the X’s and pivot a pencil around to trace out the shape of the bowl.
Step 4
Cut Holes With a Jigsaw
Drill a 3/8-in. hole inside the circle that fits a jigsaw blade, then cut out the holes.

Step 5
Mark the Sides
Sand all the boards smooth with 120 and 180 grit sandpaper. Then use one of the side pieces to trace their width on the top and bottom boards. This will show you where to drill pilot holes and screw the top and bottom boards to the sides.

Step 6
Fasten the Top and Bottom
Drill pilot holes with a countersink bit through the top and bottom boards. Apply glue to the ends of the side boards, then flush the boards up and fasten them together with screws. I used black decorative screws so they would blend in with the finish I’m using.


Step 7
Stain and Apply Finish
After sanding the outside of the assembled dog feeder smooth, apply your favorite stain and top it off with a polyurethane.
To stain the raised dog feeder I used india ink, available at many craft stores. The ink penetrates each part of the wood grain differently, keeping the grain easily visible while remaining really dark.
Once the polyurethane topcoat is dry, fit the bowls in place, fill ’em up and watch your happy dog go to town.

Does your pet have a special talent you want to show off? We’re searching for talented pets across the United States and Canada—dogs, cats, lizards, birds, you name it. If your furry, feathery or scaly friend has a captivating skill or a neat trick that you’ve captured on video, we want to see it! Send the clip to us and you could qualify to win $5,000 or other cash prizes and your pet could be named the World’s Most Talented Pet 2025! Enter the contest here.