


Play it smart and stay safe when wiring receptacles and switches.
Wiring a Switch and Outlet the Safe and Easy Way

Updated on Sep. 18, 2024
Do you know how to wire a light switch? How about a receptacle, aka outlet? If the answer is no, you should learn! It’s not hard, but it does take careful attention to detail. Electricity is nothing to mess around with because even a tiny amount can cause injury and even death. But don’t let that scare you off. Learning how to wire a light switch or receptacle is a great introduction to home renovations and other DIY projects.
Before you jump in, get familiar with the terminology and rules that will keep you and your family safe. John Williamson, a licensed master electrician and former chief electrical inspector of the state of Minnesota, says, “The National Electrical Code (NEC) has implemented several changes over the last few years, so the DIYer needs more information than ever before.” The NEC isn’t the law itself, but states adopt the code — and enforce it — to reduce fire hazards and other risks.
I’m an experienced electrician, but even I couldn’t explain everything there is to know about wiring switches and receptacles. Ahead, I enlisted Williamson and two other experienced electricians to discuss pro tips and tricks and NEC rules so you can safely and efficiently wire receptacles and switches.
1
/
17

Research the Task
“The first thing any homeowner needs to know is if they are not comfortable or do not know what they are doing when it comes to working with electricity in any way, hire a professional,” says Joe Hammer, owner of SAK Plumbing & Electrical of Phoenix, Arizona. “Working with electricity is completely different than fixing a leaky pipe or squeaky door.”
That’s true, but Williamson says you got this: “Replacing switches and receptacles is still very much something that a DIYer can do!” Before you jump in, do your research. Figure out if learning how to wire a light or receptacle is something you want to tackle. “The internet is indispensable, especially YouTube,” Williamson says. “I do it all the time.”
2
/
17

Have the Right Tools Handy
You don’t need a full tool bag for receptacles and switches, just a 4-in-1 screwdriver, wire strippers, a level and some electrical tape. You also need a way to test that the electricity is off. No one tester does it all, so Williamson says these will cover your bases for most electrical projects:
- Non-contact voltage tester. This tool beeps and lights up when it detects a live circuit. Use a non-contact voltage tester every time you do DIY electrical work.
- Plug-in GFCI receptacle tester. This handy gadget fits in the palm of your hand and tells you if a receptacle is properly wired. Plus, if the lights come on, you know you have power.
- Analog or digital multimeter. This is a great tool for investigating problems, like if you suspect a broken wire somewhere in the circuit, or to check how much voltage you’re getting across your devices.
Bonus tool suggestion: a circuit tracer. “Years ago, circuit tracers were spendy gadgets,” Williamson says. “Today, they are very economical, and the technology is so much better.” Insert the transmitter into a receptacle or light socket, and sweep the receiver over the panel to identify the corresponding circuit breaker.
“Each tester comes in handy for different testing tasks,” Williamson says, “so it’s important to read and understand the instructions to know tester functions and limitations.”
3
/
17

Turn Off the Power
“Turning off the breaker is a crucial step before doing any type of electrical maintenance,” says Gerald Talbot, licensed electrician with Mister Sparky. If you’re lucky, the breakers in your panel will be nicely labeled. “Most states require this labeling for safety and compliance issues,” Hammer says. “Each breaker must be marked to indicate which area of the home they are providing power.” Find the corresponding breaker and shut it off.
Often, breaker labeling is questionable. If that’s the case, plug something in that will audibly turn off when you cut the power, like a television. Turn it up loud, and start flipping breakers. When the sound cuts out, you’ve found your circuit. For a light switch, turn it on and flip the breakers until the light goes off (enlist a friend if you want to save on walking back and forth).
Flipping the main breaker is always an option. “To ensure you are turning off the correct breaker, locate your breaker box and flip off the main breaker,” Talbot says. Be aware that the larger service conductors coming in from the outside transformer will remain powered even with the main switch off.
4
/
17
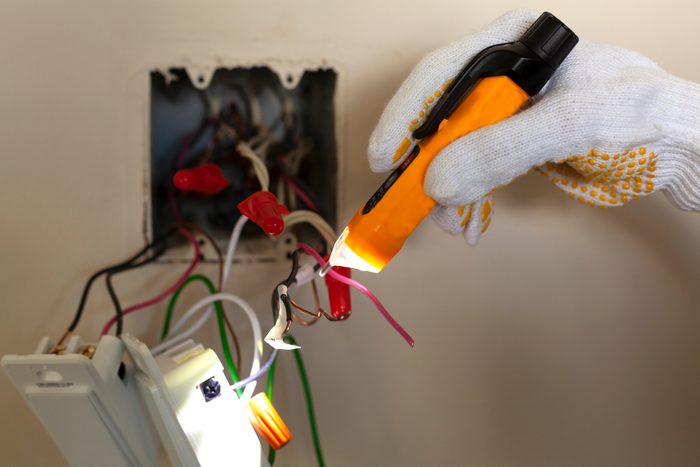
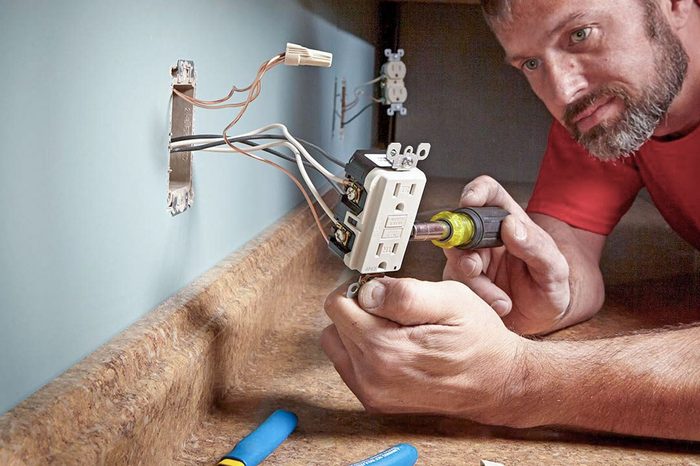
Test Every Circuit
Before you start digging around in any switch or receptacle outlet, “test, test and test again,” Williamson says.
Use your non-contact voltage tester, first verifying that it works by testing it on a known live circuit. Carefully remove cover plates and devices, and don’t grab switches or receptacles by the terminal screws, at least until you know the circuit’s off. Check every wire and connection with the tester to make absolutely sure they’re de-energized. Once you’ve verified all circuits are dead, test the tester again on a live circuit to ensure it didn’t malfunction.
5
/
17

Look for a Neutral Before Buying Smart Switches
Smart switches, programmable dimmers, occupancy sensors and other electronic controls need a grounded conductor, aka neutral, to work. That’s why the NEC requires a grounded conductor at switch boxes in new construction, remodels and repairs, with few exceptions.
Before you buy smart devices, check to see if you have a neutral in the box. It should be white, tucked in the back of the box and not connected to the light switch. (If a white wire is connected to the switch, it’s not being used as a neutral.)
“If the device requires a grounded conductor, but one is not available in the box, homeowners need to find a suitable alternative,” Williamson says. Look for devices that say “no neutral required.” Be aware you may need to purchase an additional hub or Wi-Fi bridge for them to operate. Read the instructions carefully. “If you install a device contrary to the manufacturer’s installation instructions, it might create an electrical hazard,” Williamson says.
6
/
17
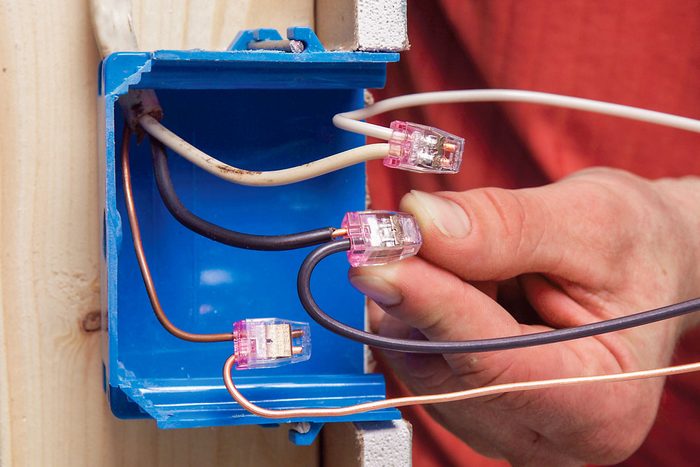
Extend Too-Short Conductors
“Short wires can cause a host of potential hazards and make connections difficult, so if you realize the wires are too short, simply extend them with connectors,” Talbot says. You can use wire nuts, push-in connectors or lever nuts, called Wagos, which are easier to work with in tight spaces. You’ll also need short lengths of wire, aka pigtails, which you can buy or make out of leftover, same-size Romex (which electricians call non-metallic sheathed cable or NM-B).
If your opening is less than 8 inches in any dimension, which is likely in a residential switch or receptacle box, when extended, the wires should stick out of the box at least three inches to comply with the NEC.
7
/
17
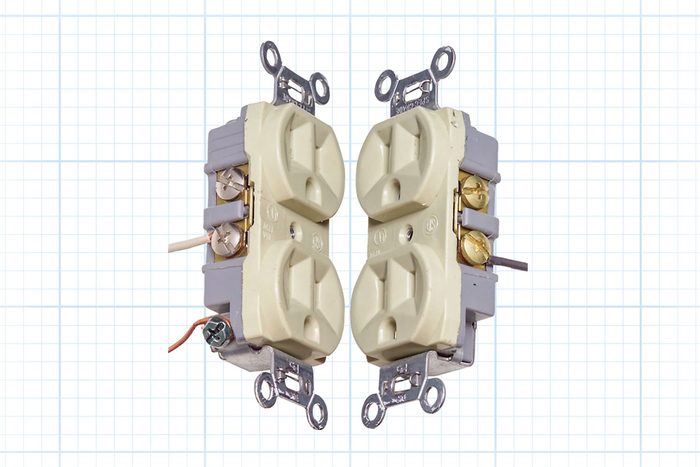
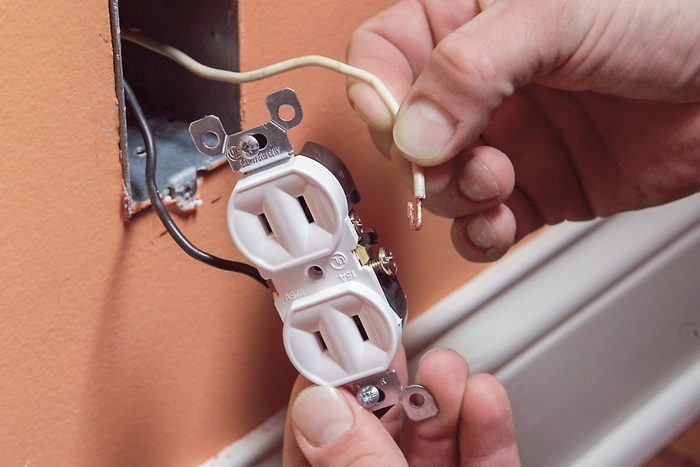
Don’t Reverse Hot and Neutral
If you look on the back of a basic duplex receptacle, the hot terminal screws are labeled “HOT,” and are brass-colored, while the neutral terminal screws say “WHITE,” and are silver-colored. If you accidentally switch the connections, the receptacle will still work, but it’s not safe. What’s worse is you won’t know anything’s wrong until someone gets shocked.
Always connect hot wires to brass screws and neutrals to silver. Unless they have electronic controls, switches will not have a neutral connection. The green screw on a receptacle or switch is for connection of a grounding means, specifically the bare copper or green equipment grounding conductor, if present in the box.
8
/
17

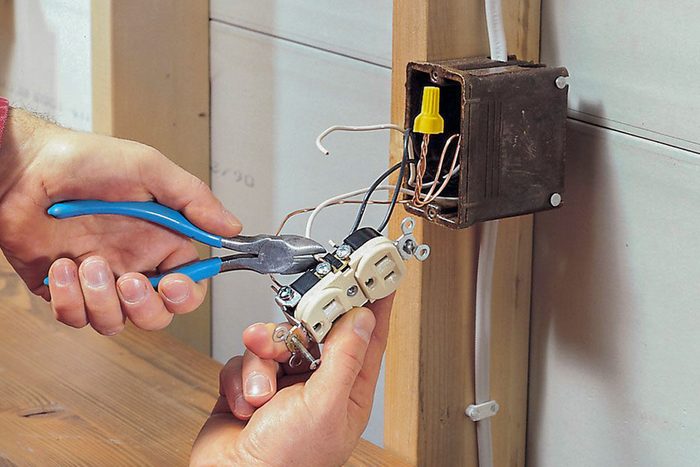
Avoid Backstabbing
In addition to terminal screws, receptacles and switches may have holes where you can alternatively “backstab” the wires into the device.
While backstabbing is perfectly legal, I don’t recommend it. Over time the connections can loosen, causing arcing and potentially, fires. Instead, make hooks in the ends of your electrical conductors and wrap them clockwise around the terminal screws. Tighten the screws with a screwdriver, and wrap electrical tape around the whole shebang. Smart switches and receptacles will likely have small stranded wires instead of terminal screws. Use appropriately-sized wire nuts to connect these devices.
9
/
17
Wire GFCI and AFCI Receptacles
Ground fault circuit interrupters (GFCI) and arc fault circuit interrupters (AFCI) protect you from shock and your house from fires, respectively. The NEC requires them to be in many locations for new construction, remodels and repairs (you don’t have to run out and replace old devices immediately). Check with your local electrical inspector if you’re unsure where you need them. The protection can be from receptacles or breakers.
If you use a receptacle to protect the circuit, it must be installed in the first outlet after the electrical panel. Look on the back of the device to find two sets of terminals labeled “LINE” and “LOAD.” There will be tape over the load side; only remove it if you are connecting downstream devices. The hot wire goes on the line side, and the load side connects to the next receptacle. The entire circuit can be daisy-chained together, with protection provided by the first GFCI or AFCI (you can use standard receptacles for all the others).
10
/
17
Make Two-Prong Receptacles Safer
My last house was 120 years old, and the wiring was terrible, with ancient knob-and-tube conductors and lots of ungrounded, two-prong receptacles, officially called “non-grounding type receptacles.” There are a few ways to replace these and make them safer, without rewiring your house. Here are your options:
- If you do not have a grounding method in the box, like a bare or green copper equipment grounding wire, put in a GFCI if you have room. “If nothing else, the GFCI will provide some sort of shock prevention,” Williamson says. Use the load side to protect other receptacles on the circuit, but make sure to label the GFCI “No Equipment Ground,” and the downstream receptacles “GFCI protected” and “No Equipment Ground.” (These stickers come with the GFCI receptacle.)
- You are also allowed to swap out the two-prong, non-grounding type for another one exactly like it, but this won’t provide any protection or give you a way to plug in a three-prong cord (never use an adapter, or remove the grounding prong on a plug). If you do have a grounding means in the box, you have to install a three-prong receptacle.
11
/
17

Use Tamper-Resistant Receptacles
Your mom or dad probably has a story about you or a sibling sticking something in an electrical socket. Or, maybe you’ve child-proofed your home with safety devices to prevent this dangerous rite of passage. According to the National Fire Protection Association (NFPA), about 2,400 children are injured every year from this very act, including several deaths.
“Tamper resistant (TR) receptacles are used to keep foreign objects from being inserted inside them,” Hammer says, and the NEC requires them nearly everywhere in your home, with a few exceptions. If you’re updating an old receptacle, replace all non-TR receptacles with TRs. “Hopefully, most adults know not to stick a fork in an outlet,” but for a kid, it’s a real concern. “It literally keeps your kids safe from being electrocuted,” Hammer says.
12
/
17

Pack Boxes Neatly
Electrical boxes have limited space to begin with, and the device and conductors take up a lot of space. “For new work, I install the biggest box possible,” Williamson says. I spare no expense. The extra cost of a larger box is a tiny percentage of the overall cost of the electrical materials for the project.”
But unless you’re roughing in a new addition, you may not have the luxury of a nice big box. You’re stuck with what the electrician added originally, when devices used to be a lot smaller. Use pigtails sparingly, and once you’ve made a connection, fold the wires neatly and push them to the back of the box. Keeping wires and connections neat and orderly is safer, and will cause fewer headaches for you and future homeowners.
13
/
17
Support Your Work
Loose switches and receptacles are annoying to operate and dangerous. When you plug in an appliance cord and the receptacle wiggles around or shifts back in the box, think about what’s happening inside. Those conductors are moving, too; little by little, they can come out of their splices or connections. Loose wires tend to arc and overheat, creating a potential fire hazard.
Fix loose outlets by shimming under the screws with spacers to create a tight connection to the box. Electricians call these plastic spacers “caterpillars,” or you can use a small nut or spiral of copper wire. Remember that the NEC only allows a quarter-inch setback for boxes in non-combustible wall materials like drywall and tile. If the box is made of wood paneling or other combustible material, it must be flush.
If your switch or receptacle is set back farther than required, don’t use caterpillars. Instead, add a box extender.
14
/
17

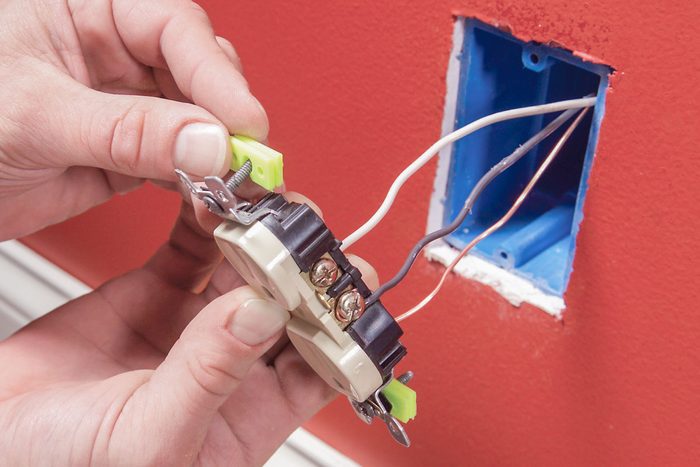
Wire a Three-Way Switch
A two-pole switch is the simplest electrical device. Flip it one way, and the power passes through the switch, turning on the light. Flip it the other way, and the switch breaks the connection, turning off the light.
When you start talking about three-way and four-way switching, which control lights from multiple locations, things get confusing. As an apprentice, I spent hours troubleshooting a three-way switch setup until I finally had an “ah-ha” moment. Here’s how they work:
- Basic snap switches have two hot (brass) terminals and one green ground screw or wire. Power comes in on one terminal, and a “switch leg” carries power to the light from the other terminal.
- On a three-way, there’s an extra terminal, called the “common.” Power comes in to the switch on the common, then two “traveler” wires connect the first switch to the second on the brass terminals.
- On the second three-way switch, the switch leg goes from the common to the light(s). With this setup, either switch controls the light. To control a light from four or more locations, add a four-way switch in between two three-way switches.
15
/
17

Identify All Wires
The non-sheathed cable used in many residential settings is commonly called Romex, a popular brand of cable assembly. “Each wire has a different purpose in a Romex cable,” Hammer says. For 120-volt household circuits, the black wire is the hot, and the white wire is the grounded conductor, aka neutral. On a 240-volt circuit, like the one feeding your electric dryer, you’ll have two hots, one black and one red.
It’s common to have more than one circuit in any given electrical box, so it’s a great idea to label or otherwise identify your wires. Use a marker and electrical tape, painter’s tape or twist wires together in a way you can recognize. If you don’t, “once the drywall is installed and the wiring is hidden from view, maybe weeks or months later, it can be a nightmare,” Williamson says.
16
/
17
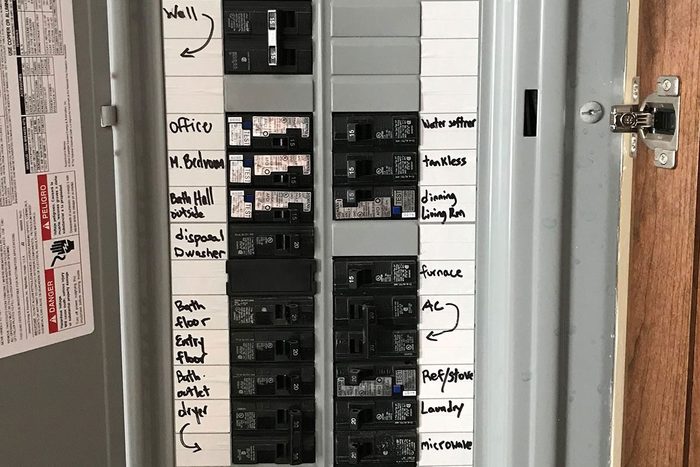
Label Your Breakers
Labeling your wires is only part of organizing your electrical system. If you had to do a lot of legwork tracking down the circuit you wanted to work on, now’s the time to fix that. Find out what each breaker controls, and take the time to label your breakers. “This could be a color system, [or] a piece of tape next to the switch on the breaker” with descriptions of each corresponding room written on it, Hammer says.
When it comes to electrical safety, knowing how to wire a light switch or receptacle is only part of doing responsible DIY electrical work. Grab some tape and a magic marker, and take 20 minutes to investigate and label your circuits. Keeping your panel organized will help you and future residents be safe and secure.
17
/
17

Get a Permit for Major Work
“Permitting for DIY work will vary based on your state and local legislation,” Talbot says. In Dallas, where I live, homeowners can add up to six 120-volt receptacles without a permit and do the work themselves. Updating a light switch or adding a light fixture is fine, too. Your jurisdiction likely has different rules, so check with your city or state if you’re not sure.
Times change, too. “The physical task of replacing the devices has not changed, but the NEC has implemented several changes over the last few years, so the DIYer needs more information than before,” Williamson says. If you have any concerns, Talbot recommends homeowners consult a licensed electrician when doing major electrical alterations, even if a permit isn’t required. “Electricians are well-versed in city permits and codes,” so reach out anytime. That’s why we’re here.
FAQ
What is the red wire for on a light switch?
The red wire is usually a secondary hot wire. On a smart switch, the red wire often connects to the switch leg to control a light or other load. Within an electrical box, a red wire may be a traveler, a switch leg or the second hot of a 240-volt circuit.
Can you wire a light switch backwards?
You cannot wire a standard two-pole switch backward. Each of the two brass screws can accept the power or the switch leg (separately, of course!). Because smart switches use a neutral wire and a hot wire, they can be wired backward. Three-way and four-way switches can be wired incorrectly if you mix up the travelers, hot wire or switch leg.
Do all light switches have a ground wire?
If the switch is new, it will have a green screw or wire. “Switches and lighting controls now come with a green grounding screw or green pigtail wire, and are required to be connected to an equipment grounding wire or metal box that is grounded,” Williamson says. “Likewise, for receptacles.” But, if your home is old, you may not have a grounding means in the box to connect the green screw or wire to.
About the Experts
- John Williamson is a licensed master electrician and certified building official who spent 45 years as an electrician, inspector, instructor and administrator. He also spent three decades consulting on and writing about electrical DIY projects for book, magazine and digital publishers.
- Joe Hammer is the owner of SAK Electric & Plumbing Inc., a Phoenix based electrical and plumbing company serving the greater Phoenix area for over 30 years. Hammer has extensive experience in all facets of the construction industry, and he and his team of electricians provide homeowners and businesses with affordable and code-compliant electrical repair and installation.
- Gerald Talbot is a licensed electrician and owner of a Mister Sparky electrical services franchise in Chattanooga, Tennessee.
Sources
- National Fire Protection Association: “Tamper Resistant Electrical Receptacles.”
Also, learn how to upgrade light switch covers.