


Build a laminate countertop from scratch.
Installing Laminate Countertops

Updated on Jan. 30, 2025
1
/
16
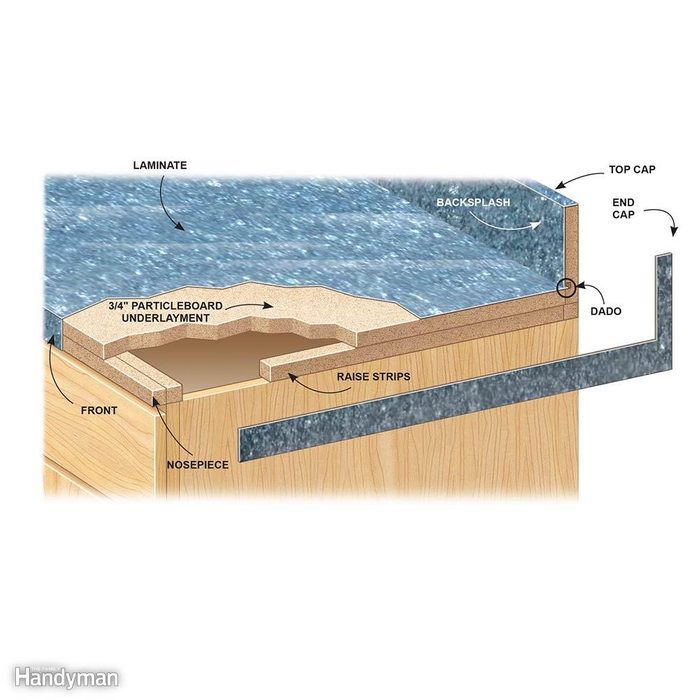
Cut Underlayment, Backsplash and Raise Strips
Measure your cabinets and cut the required pieces to assemble your countertop and backsplash (Figure A). Cut the underlayment so it sticks out 1 in. past the finished ends of the cabinet, or make it flush if the cabinet abuts an appliance. Cut a 1/4-in.-deep, 1/4-in.-wide dado (groove) into the backsplash to give you a little wiggle room when you fit and install the laminate. Cut the dado by making a few passes on your table saw, or use a router. On factory-built cabinets, 3/4-inch particle-board “raise strips” should be installed to make sure the top drawers will clear the front edge of the kitchen countertop.
2
/
16

Install the Underlayment
Install the raise strips along the perimeter of the cabinets, except where the underlayment corner seam will be. Instead, install a board under the seam(s) to provide support. Stagger the top, backsplash and nosepiece seams at least 1/2 in. Fasten it all together with 1/4-in. crown staples that are 1-1/4 in. long and spaced about 5 in. apart—no glue required.
3
/
16
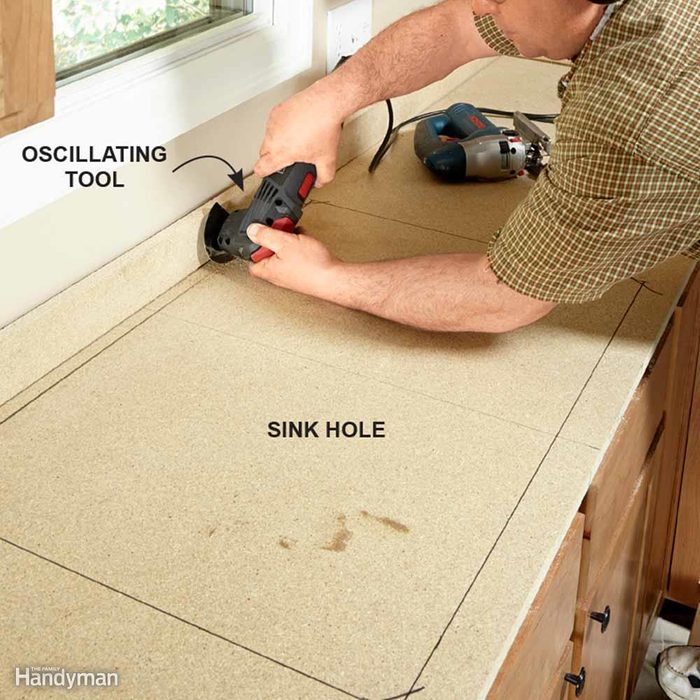
Cut the Sink Hole
Cut the hole for the sink after installing the underlayment but before adding the laminate. Make sure you have your sink on hand so you’ll know what size hole to cut. Cut the back side of the hole with an oscillating tool, and then cut the sides and front with a jigsaw. Lara says the best tool to use is a jigsaw with a fine-tooth blade. “First, carefully measure, mark the cutting line and drill start holes in each corner of the intended cutout,” Lara says. “This approach provides precise control and minimizes chipping when working with underlayment materials.”
4
/
16
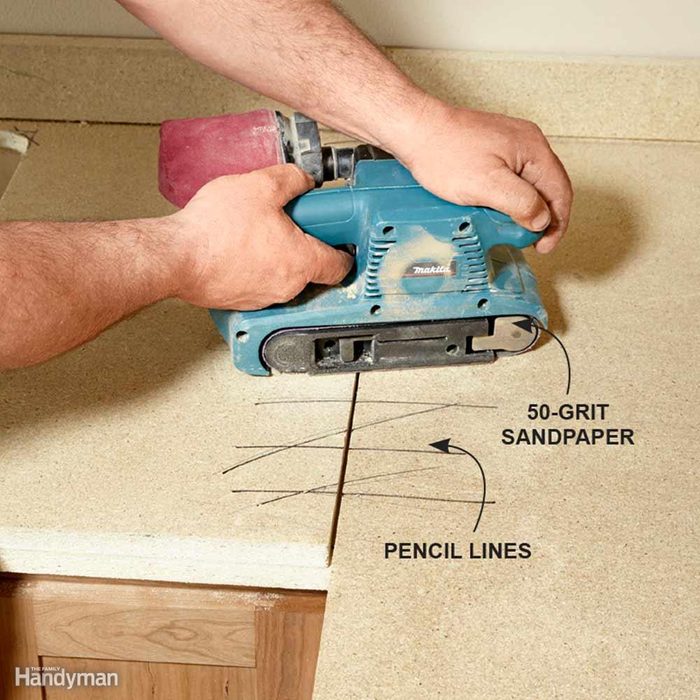
Sand the Seams
It’s okay if there’s a small gap between the underlayment boards, but the seam has to be absolutely flat. Here’s a trick for getting the seams perfect: Mark the seam with a pencil, then sand with 50-grit paper until the lines disappear.
5
/
16
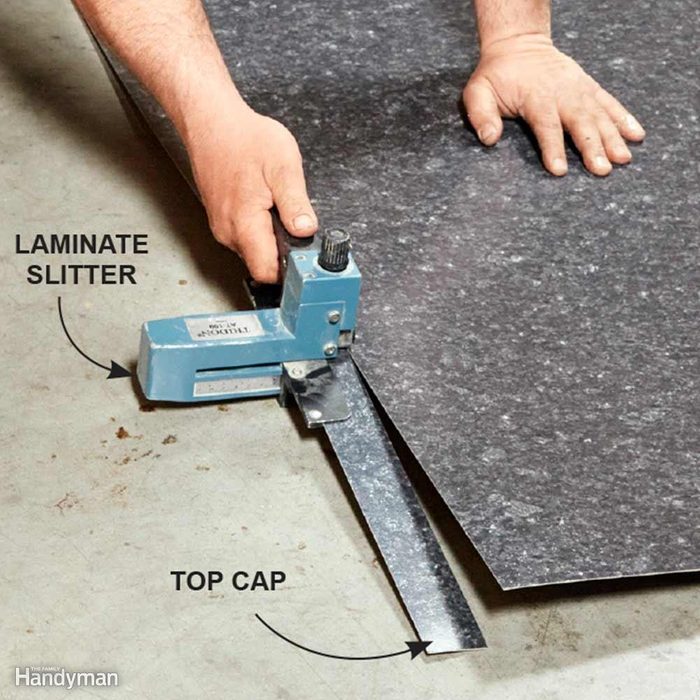
Cut Narrow Pieces First
Laminate can be cut with a trim router, circular saw, utility knife or a special tool called a laminate slitter. The slitter isn’t cheap (roughly $150), but it has an adjustable guide and makes quick work of difficult, narrow cuts. Cut any narrow strips first, before rough-cutting the large kitchen countertop pieces. All the pieces will be cut a bit long and trimmed down after they’re installed. Make sure you have enough of the sheet left over to cut the large L-shaped section.
6
/
16
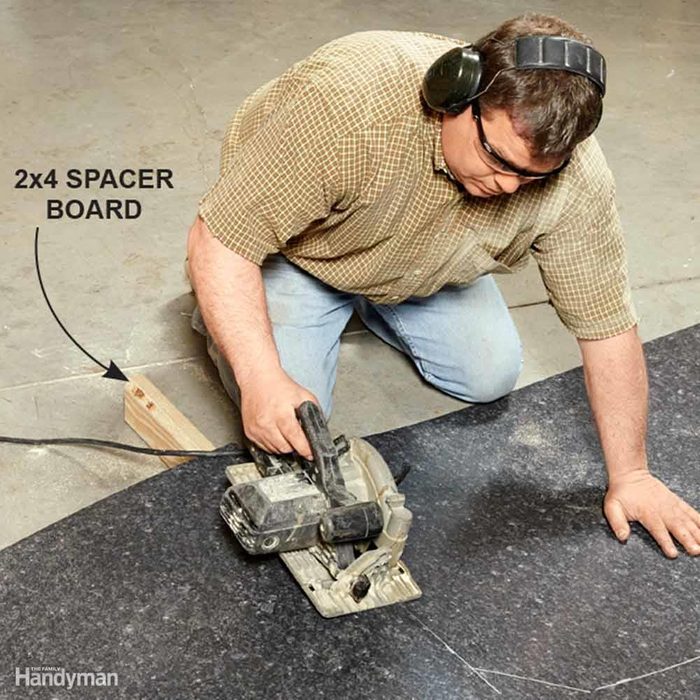
Rough-Cut the Top With a Circular Saw
Cut the main top piece of the laminate with a circular saw. Use a board to create a space so the saw blade doesn’t grind into the floor. Avoid scratching the laminate by sticking a few strips of masking tape to the underside of your saw base. The front side of the laminate will hang over the edge of your cabinets and be trimmed off, so your cuts don’t need to be perfect.
7
/
16
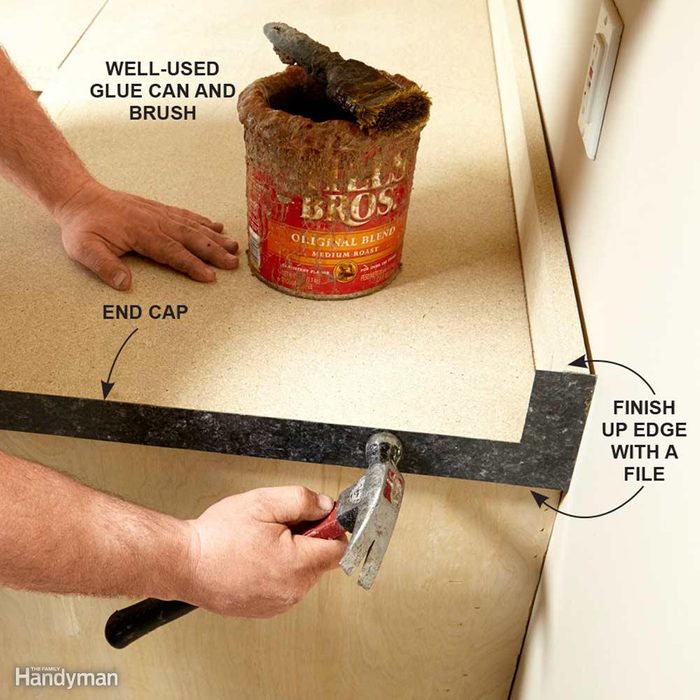
Glue the End Caps First
Cut the end cap so the bottom portion and the very top are close enough to be cleaned up with a file. The rest will be trimmed with a router. Cut the end cap to size with snips, and clean both surfaces with compressed air. Next, paint a thin layer of glue on both surfaces. “Choose a high-quality contact cement specifically for laminate installation,” Lara says. “Be sure to follow the manufacturer’s instructions regarding the ‘tack time’ (waiting period before joining the surfaces).” Carefully line up the top and ends and set the piece into place. Lightly tap the end cap piece with a smooth, burr-free hammer to join, and trim the edges with a router.
8
/
16
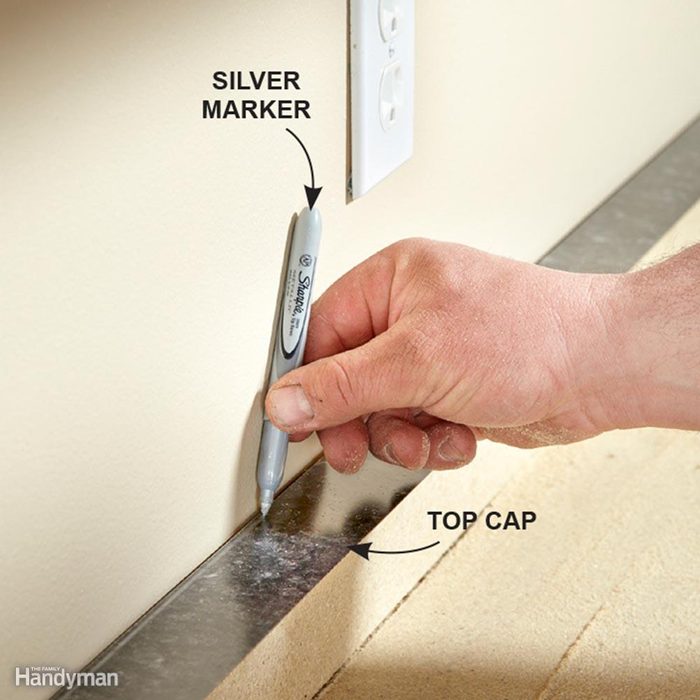
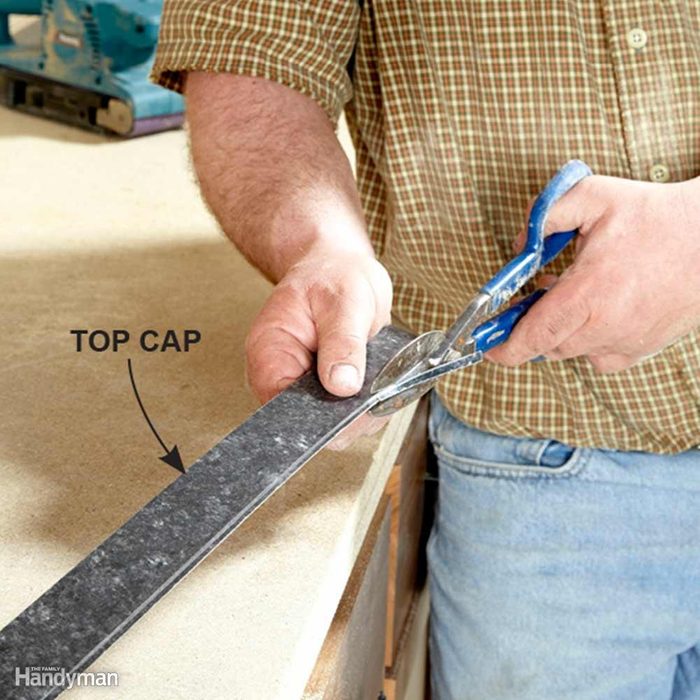
Scribe and Cut the Top Cap
Next, fit and trim the top of the backsplash. Use a silver marker, pencil and compass or other scribing tool to transfer the contours of the wall to your backsplash top cap. Carefully cut the top cap with tin snips (to avoid cracking the laminate, keep cuts to 1/4 in. or less). Clean up the edge with a belt sander.
Make Small Cuts
9
/
16
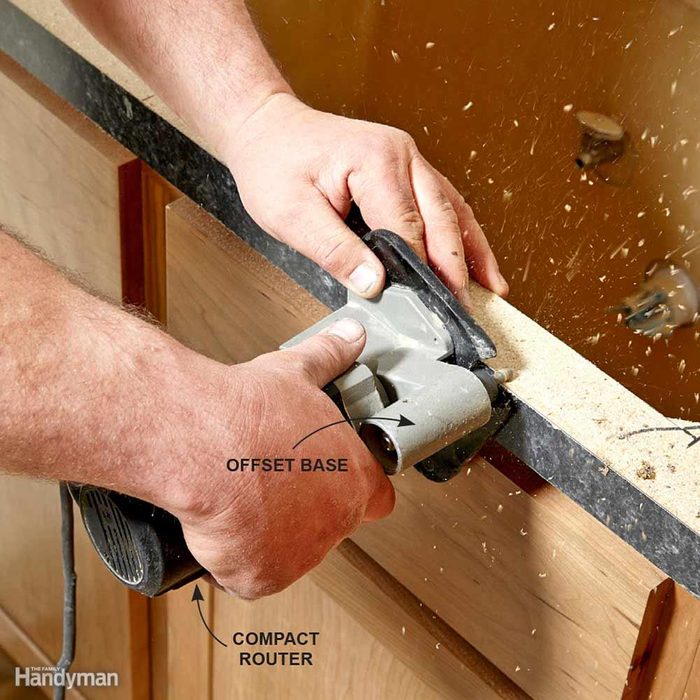
Trim Excess Laminate in Place
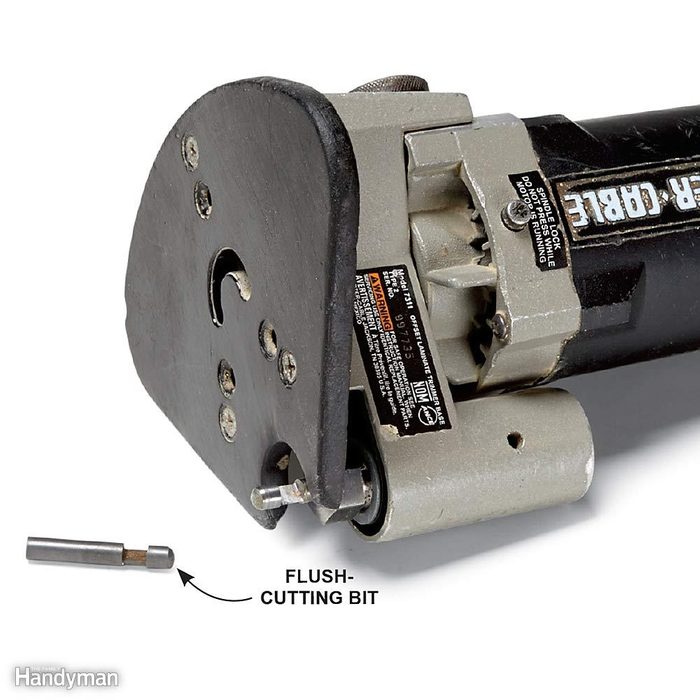
Install the front edge flush with the bottom of the underlayment and set it with a hammer. “After gluing, for a clean finish use a router to trim any excess,” Lara says. A compact router with an offset base is a must-have when you’re building kitchen countertops in place. “Be sure your bit has a ball-bearing guide to avoid scorching edges or chipping joints.”
10
/
16
Avoid Router Gouges
Here’s a pro tip: Keep the router moving when trimming the main countertop and the top of the backsplash. The guide of your router bit will be running along finished laminate, so if you stop for any length of time, the bit will grind into the surface of the laminate. Rub a little petroleum jelly along the edge where the bit rides to prevent marring.
11
/
16
Apply Adhesive With a Scrap
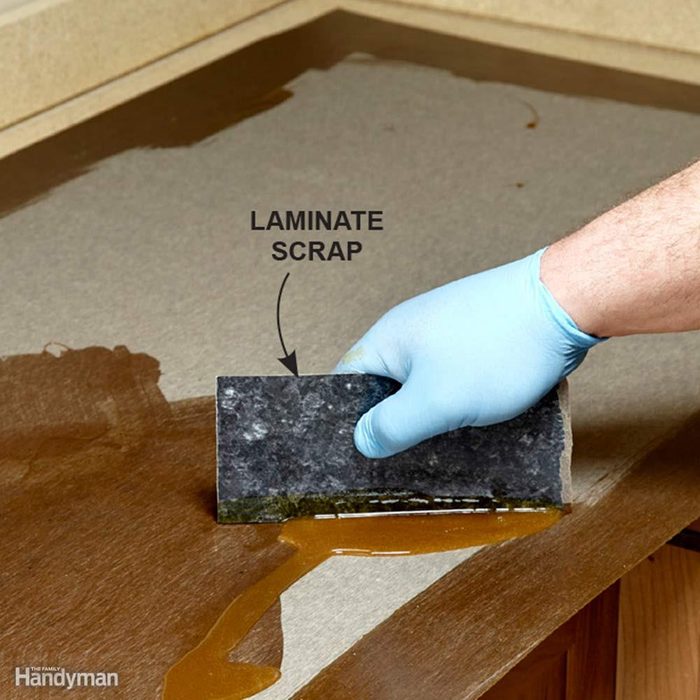
“Make sure both the laminate and underlayment are clean and free of dust or debris before applying adhesive,” Lara says. Clean all surfaces with compressed air, then apply glue to the perimeter of the laminate with a brush. Grab a scrap piece of laminate to spread on the rest. Apply the glue on the underlayment the same way. It gets messy trying to glue the backsplash after the top is installed, so cover the backsplash with glue at the same time. Wear gloves and an organic vapor respirator, and open a window or turn on an exhaust fan (if present) when working with strong chemicals.
12
/
16
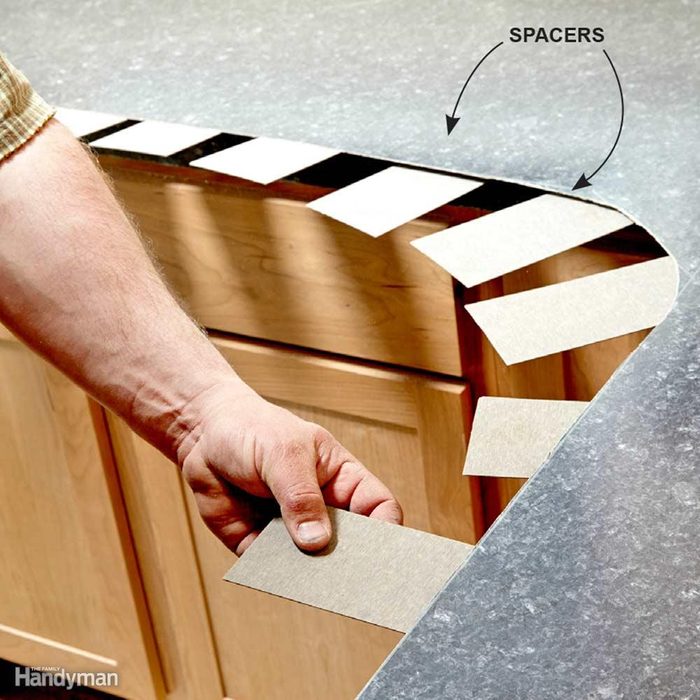
Use Spacers to Install the Top
Laminate adhesive is sometimes referred to as “contact cement,” because it sets as soon as the two coated surfaces come into contact. “This glue is applied to mating surfaces, and when they make a firm connection, they are permanently attached,” Lara says. “There is no maneuvering room the way there is with most glues.” That makes life difficult when you’re trying to move a large, floppy sheet into place.
To make things easier, cut strips of leftover laminate and use them as spacers. Because the adhesive won’t stick to the strips, you can slide the sheet around. Once the top sheet is in position, remove the spacers from the center outward, smoothing as you go. Make sure the spacers are clean so they don’t leave debris behind.
13
/
16
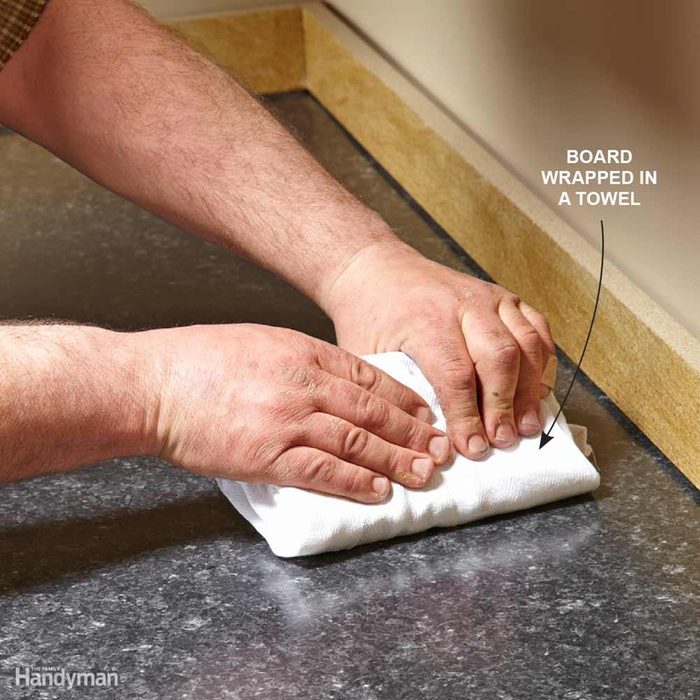
Smooth Laminate With a Board
To smooth and adhere the laminate to the substrate, you can use a J-roller (named because it’s shaped like a “J”), or a straight piece of wood wrapped in a towel. Start on the back side and work your way out to the edges, applying firm, even pressure.
14
/
16
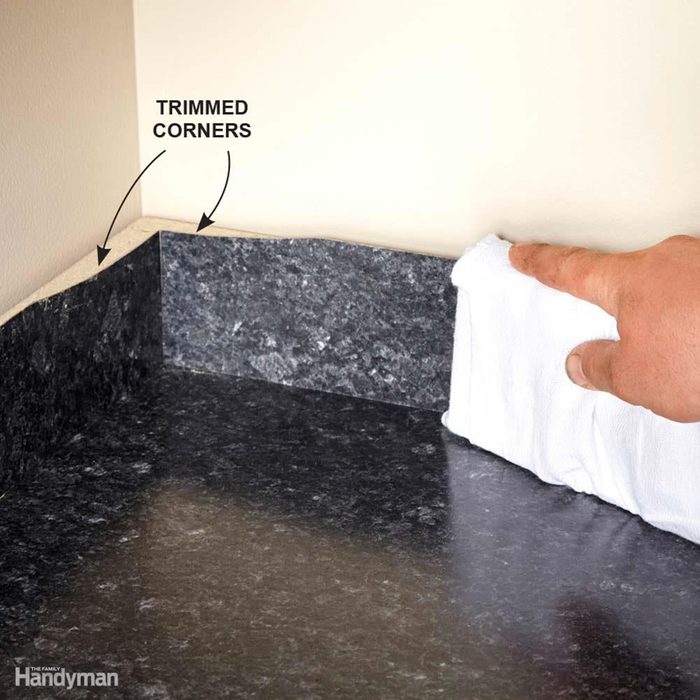
Trim the Backsplash With Snips
A router won’t be able to reach the inside corner of the backsplash, so use tin snips to trim it down before you install it. Again, make small cuts so you don’t chip the laminate. Trim the laminate close to the backsplash so you won’t have as much material to remove with your file. Press the section on with a board the same way you did the top. Tap the top cap piece into place with a hammer.
15
/
16
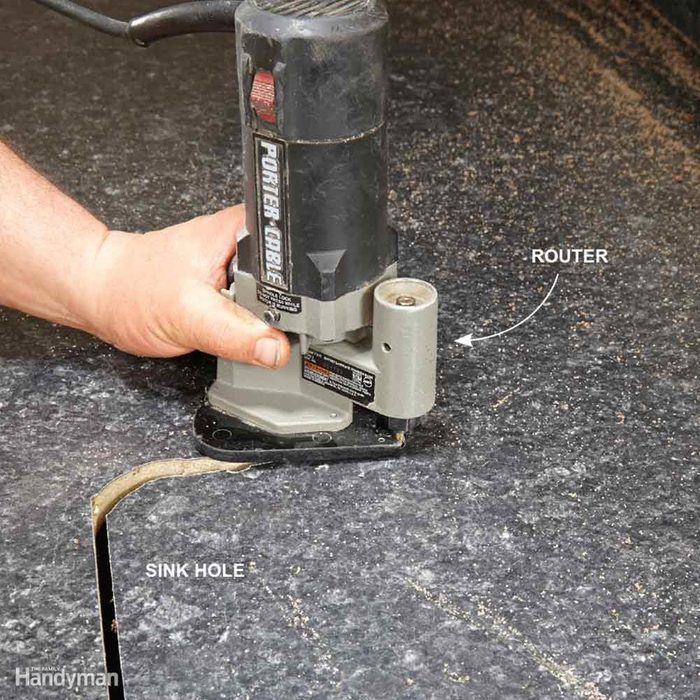
Trim Out the Sink Hole
Use your router to trim the hole for the sink. Just poke through the material with a spinning bit, and work your way to the edge. Right before you finish the cut, support the scrap material so it doesn’t fall down and tear out the last little section.
16
/
16
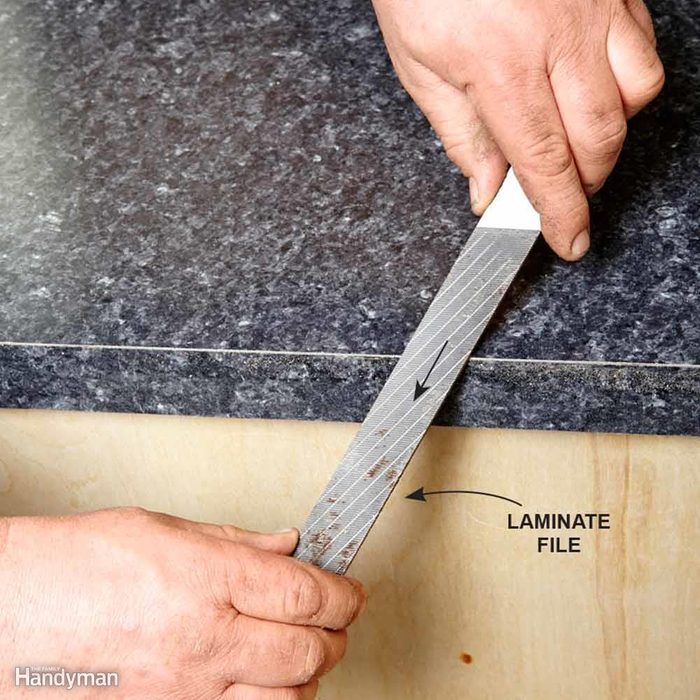
File Downward
Once all the pieces are in place, “use a file to smooth out any rough edges,” Lara says. Buy a file specifically designed for plastic laminate, and always file in a downward direction—never back and forth. Clean off excess glue with lacquer thinner, or whatever solvent your adhesive manufacturer recommends.
About the Expert
William Lara is a virtual handyperson expert at Frontdoor, an all-in-one home services app that’s like telehealth for your house. Lara has extensive experience in the construction industry, including installing countertops and cabinets. At Frontdoor, Lara helps people fix their own home maintenance issues by walking them through repairs via tech-enhanced virtual video chats.