


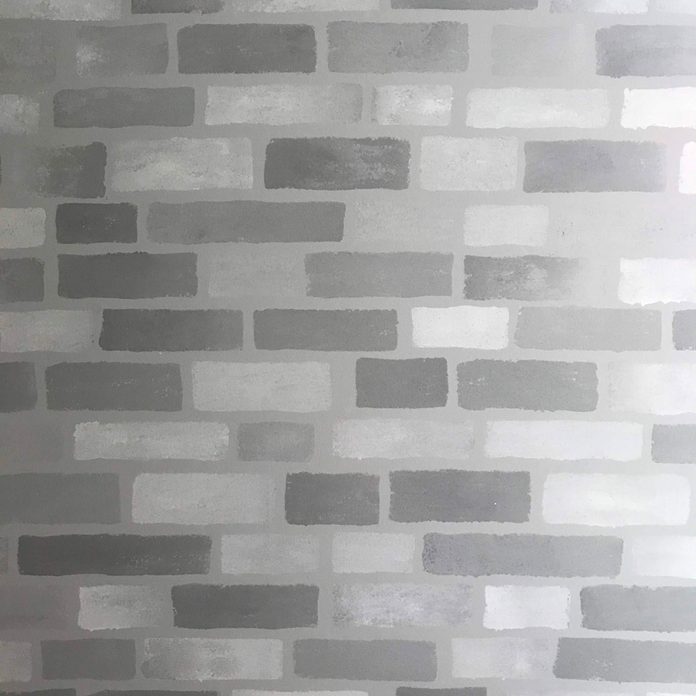
Want a brick or stone accent wall without the commitment and hassle of masonry? Try this DIY faux brick accent wall you can create in one day with interior house paint and a few supplies.
Create a Faux Brick Accent Wall with Paint in 4 Easy Steps
1
/
6
Faux Brick Wall Supplies
- Interior paint (base color)
- Interior paint (3 to 5 contrasting brick colors)
- Painter’s tape
- Plastic quilting template (or household sponges)
- Utility or X-acto knife
- Hard-bristle paintbrush
- Disposable plate or scrap of heavy cardboard
- Level
Here’s a great paint can hack to use when you need to store leftover paint.
2
/
6

Faux Brick Wall Painting Step 1. Base Color
Paint your wall with the base color. This color will become the “mortar” of your accent wall, so generally you will want to choose a light to medium gray or beige. If the existing paint is close enough you can skip this step, or follow these tips to paint a room fast.
3
/
6
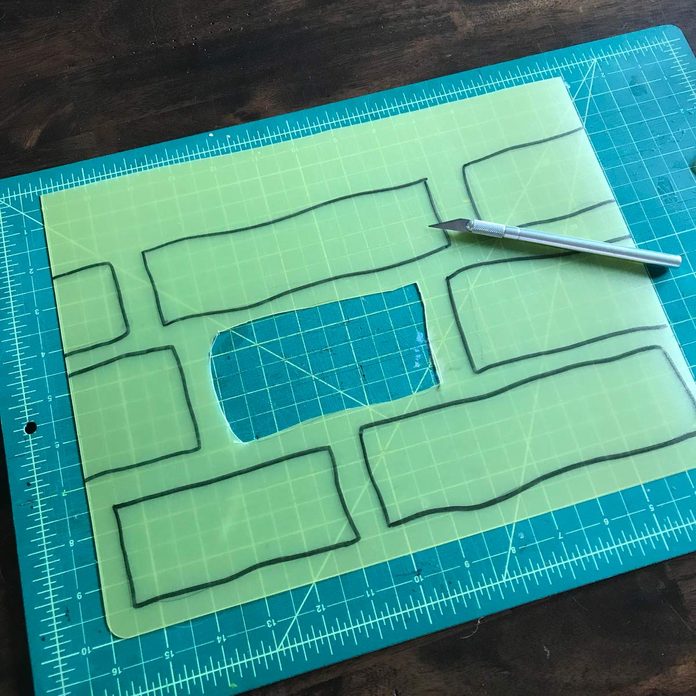
Faux Brick Wall Painting Step 2. Create Your Stencil
Using a plastic quilters template sheet, sketch out your brick pattern, and cut out each “brick.” For a uniform look, cut straight rows of the same-sized bricks. For a more rustic look, stagger the size of bricks, round some corners and rotate a few bricks so they aren’t perfectly straight.
Editor’s Tip: Even if you don’t consider yourself artistic, we’ll show you how to use stencils to create unique works of art using only a paintbrush and a tape measure. With these simple DIY wall stencil patterns you’ll be able to create everything from a simple stenciled border to more complex patterns that will add a dramatic flourish to any room in your house.
4
/
6
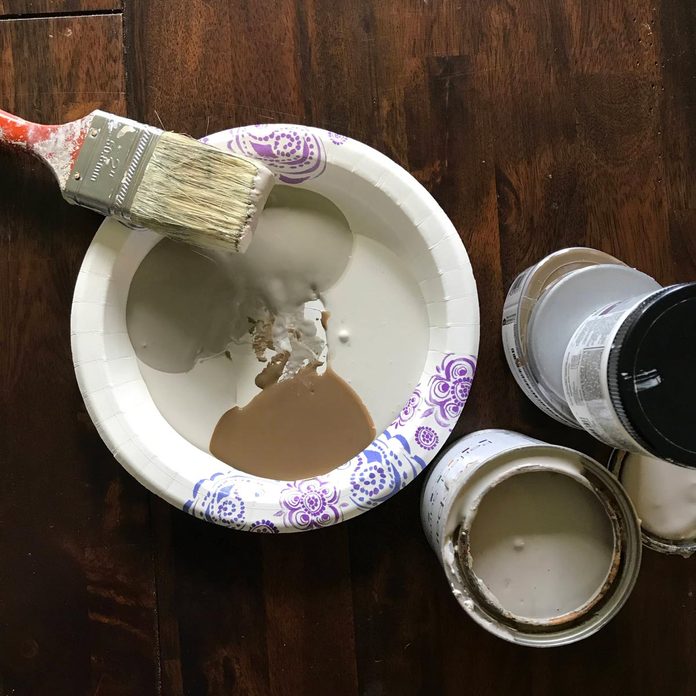
Faux Brick Wall Painting Step 3. Create Your Paint Palette
This is a great opportunity to get rid of those leftover house paints and color samples. Choose three to five contrasting colors, some lighter, some darker, in the desired color scheme. For a more traditional brick look, choose reds, rusts, browns and beiges. Or for a modern whitewashed style, choose creams and grays.
5
/
6
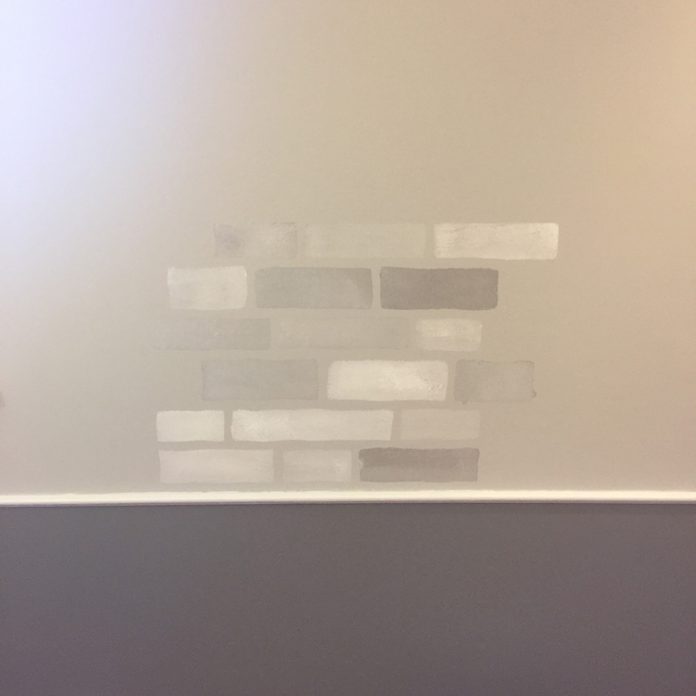
Faux Brick Wall Painting Step 4. Paint Your Accent Wall
Working one section at a time, use painter’s tape to secure the stencil to the wall. Dab your brush into the color palette, grabbing a variety of the colors—don’t worry if they mix or get messy, this will actually make the “bricks” look more authentic. Using the same dabbing technique, fill in your stencil on the wall. Continue along the wall, moving the stencil in a grid and adding more paint to your palette as needed to keep a range of color depth.
6
/
6
Faux Brick Wall Painting Alternate Method: Sponge Brick
If you want, you can skip the template and use a few household sponges cut to size as brick “stamps.” Dab the sponge on the paint palette, catching a little of each color, and “stamp” out the bricks onto the wall, moving horizontally and leaving “mortar” space between each brick. Check for even rows with a level.
FAQ
How do I prepare a wall for faux stone painting?
A smooth, clean surface is vital, so start by cleaning the wall thoroughly of dust and grease and filling in any holes and cracks with spackle. Next, sand and apply a primer that matches the base color of your faux stone design. “This step ensures your faux stone finish will go on evenly and last longer,” says handyman Andriy Boyko. “I always say: a little extra effort in prep is worth it; you’ll thank yourself when the final result looks amazing.”
How long will the faux stone finish last?
A well-applied faux stone finish can last anywhere from three to 10 years or more, depending on the quality of materials used and the environment. Use high-quality paint and a protective sealant to extend its life, especially in areas prone to moisture or heavy use.
Another key to getting longevity out of a faux stone wall is proper maintenance, says Joseph Passalacqua, owner of Maid Sailors Cleaning Service. He recommends cleaning them gently with pH-neutral cleaner and steering clear of abrasive cleaning pads or tools.
About the Experts
- Yan Margulis is owner of Capable Group, a home renovation company based in Toronto. He has more than 25 years of experience in renovation and interior painting.
- Andriy Boyko is a seasoned handyman and masonry expert at AO Handy in New Berlin, Wisconsin, and has over 30 years of experience in the field.
- Anthony Meyers is a painting specialist with eight years of experience, and owner of Renewed Walls Painting in Raleigh, North Carolina.
- Joseph Passalacqua is owner and CEO at Maid Sailors Cleaning Service, an award-winning cleaning company which serves New York City and nine states.