


Here is how to DIY some unique curtain rods in just a few hours.
A half day
Beginner
$10 - $60
Introduction
Transform ordinary windows into designer focal points with our step-by-step guide to crafting and installing DIY curtain rods.
Curtains are a welcome accessory to any room. Like a piece of jewelry, curtains can add a lot of depth to an environment if done well. But if curtains aren’t done properly, it draws the eye in a highly unflattering way.
And just like a good accessory, curtains and curtain rods can get expensive. Seriously, the only reason I purchased a sewing machine was to save money making my living room curtains. I preferred to spend the money on a very nice piece of curtain fabric that would have cost me a ton if I purchased the SAME material in an already-made curtain.
The same thought process applies to the curtain rod. I invested in hole saw bits for my drill press with a specific diameter so I could cut the wood rings I wanted. In the end, it truly is an investment, as these tools will be used repeatedly for many other projects. Besides, I love nothing more than telling guests, “I made them!”
When making curtain rods, there are many ways to go. Metal, wood, plastic? The bottom line is that, beyond serving its function by holding a curtain, a curtain rod can add some flair to the space and reflect the characteristics of the style. Decide on the color of the finish and make sure it complements the other finishes in the space.
Get as fancy or simple as you wish. Enjoy the process… To make your life easier, I share the steps with a couple of my favorite techniques: Pyrography and decorative paint finishes. Enjoy!
Bracket Overview

Cutting List
| KEY | QTY. | PART | DIMENSIONS |
| A | 2 | Top cap | 3/4″ x 1-1/2″ x 3-1/2″ |
| B | 2 | Back leg | 3/4″ x 1-1/2″ x 3″ |
| C | 2 | Ring | 3/4″ x 1-1/4″ID x 2″OD |
| D | 1 | Rod | 1″-dia. x 48″* |
Tools Required
- 1-1/4" Hole saw
- 18ga. brad nail gun
- 2 1/8” hole saw
- 7/32" drill bit
- Countersink drill bit
- Drill
- Drill press
- Level
- Measuring tape
- Miter saw
- Painting supplies
- Pyrography pen
- Stud finder
Materials Required
- 1-1/2" brad nails
- 1" dia. dowels
- 1” screws
- Appropriate installation screws / anchors
- Assorted sandpaper
- Black paint
- Metallic paint
- Scrap 1x2 and 1x3 lumber
- Tie rack pegs
- Wood glue
Project step-by-step (10)
Step 1
Make the brackets
Cut the top caps (A) and back legs (B) for your curtain rods and nail them together using wood glue and brad nails, forming an “L bracket.” Orient the top cap (A) on top of the back leg (B). If your curtain rod will be longer than four feet, or if the curtain’s fabric is heavier, make an additional bracket to serve as a center support and prevent the rod from sagging in the middle.

Step 2
Make the rings
Using a 2-1/8-in. hole saw in a drill press, cut a circle from 1×3 material for each bracket you made. Hole saws are measured by the outside diameter so a 2-1/8-in. hole saw will cut a 2-inch circle or one just slightly shy of it. Place a sacrificial board underneath the 1×3 to prevent blowing out on the back side of the circle when the hole saw cuts through.
Create a ring by cutting a hole through the center of the roughly 2-in. circle with a 1-1/4-in. hole saw. Use the same arbor hole from the 2-1/8-in. hole saw to center the 1-1/4-in. hole. When drilling with the smaller diameter 1-1/4-in. hole saw, use double stick tape to secure the circle to the sacrificial piece of wood underneath it. If necessary, lock the piece in place with other pieces of wood so that it does not move during the drilling process.
Once cut, sand the edges smooth and remove any cutting marks from the wood rings you have created.

Step 3
Burn the ring edges (optional)
Utilizing a pyrography pen, create a texture of straight lines along the outer edge of the curtain rod rings.
Set the temperature by performing a test run with the same species of wood and tip you intend to use. If your pyrography pen does not have a temperature adjustment, you will have to adjust your speed as you burn. You should move the pyrography pen faster if you are burning softwood. Slower if you’re burning harder wood. Also, slow down slightly when burning against the grain to prevent skips in your burn line.

Step 4
Cut and drill the curtain rod
Cut the one-inch dowel to the length you require, usually 12 inches wider than the window opening. Drill a 7/32-in. hole at each end, 1/2 inches from the rod end. These holes will accommodate the small tie rack peg we will use as a stop to prevent the rod from falling out of the ring when curtains are drawn or closed. Drill these holes with the dowel in the same orientation to keep them aligned and symmetrical.

Step 5
Paint
Paint all pieces. First, apply two coats of black paint, and then build up the coats of your chosen metallic color to a solid finish. If you want a brushed metal look, lightly apply coats with a dry brush. If you want a solid metallic look, build up with layers. Keep in mind that your metallic paints will reflect the movement of your brush strokes. Most metallic paints will require more than the standard two coats of paint to achieve a solid look.

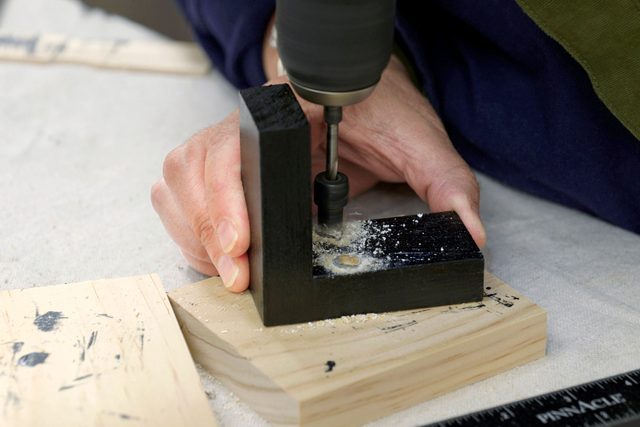
Step 6
Pre-drill hanging holes
Pre-drill the mounting holes in the bracket’s back leg (B) with a countersink drill bit so that screws will be seeded flush with the surface. The holes were drilled 1/2-in. down from the inner corner of the bracket and 1/4-in. in from the edges. Touch up the countersunk holes with primer and paint before installation.
Step 7
Attach the rings
Position the painted rings so they are aligned and centered on brackets. Pre-drill countersunk holes from the backside of the top cap (A) and back leg (B) of the bracket, and use wood glue and one-inch screws to secure the rings in place.

Step 8
How To Hang Curtain Rods
Determine the bracket placement
It is recommended that the brackets be positioned so that they are wider than the window opening in order to ensure that, when the curtains are drawn, they can completely cover the window. It is important to consider the length of your curtains as well as the location where you would like them to fall when determining the height of the bracket.
Decide how the curtain rod brackets will be attached to the wall. To determine what hardware to securely install your curtain rod brackets, use a stud finder to determine if you have a stud or hollow drywall at the desired location. Be mindful that some heavy curtains can weigh up to 50 pounds when choosing the appropriate screw or anchor.

Step 9
Hang the curtain rods and curtains
Use the appropriate screws or anchors to secure the brackets to the wall. A level should be used to ensure that the brackets are level with one another. After that, thread the curtains onto the rod and the rod through the brackets. To complete the installation and ensure the curtain rod is locked in place, insert the tie rack peg into the drilled holes at each end of the rod.

Step 10
FAQ
Why use black paint as a primer for metallic paints?
When applying a metallic paint, always use a dark color to serve as a primer and help you get to the metallic finish with less coats and help the metallic have more brilliance when done. Decorative painters often use black or red paint as a base color under silver, brass, gold or copper.
How high off the floor should my curtain be?
The proper height to hang curtains depends on the style and function of the room. Here are a few common options:
- Floor-length: Formal. Hangs 1/2 inch above floor, creating an elegant “kissing the floor” effect.
- Casual Length/Float Length: Sits about one inch above the floor for a relaxed, modern look and easy maintenance.
- Puddled Style: Extends 1-10 inches onto floor for dramatic luxury. Not recommended with children/pets.
- Shorter Length: Practical for specific situations like children’s rooms, areas with pets, or above radiators. Can make ceilings appear lower and room feel more casual.
