


Add storage space the old-fashioned way with hanging shelves
Our editors and experts handpick every product we feature. We may earn a commission from your purchases.Learn more.

Add storage space the old-fashioned way with hanging shelves
Our editors and experts handpick every product we feature. We may earn a commission from your purchases.Learn more.

From leveling to anchoring, use these tips to for sure your next shelf-hanging project. We’ll show you tips for hanging and installing everything from store-bought display shelves to DIY closet shelves. And even if you don’t have any shelf projects in the near future, you’ll find leveling and anchoring tips here that you can use on other building projects.
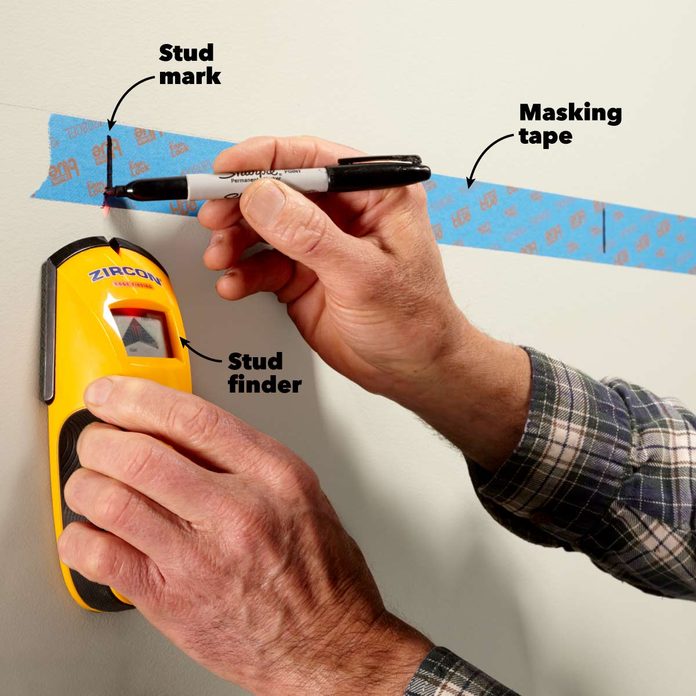
Once you locate the studs, mark along a line of tape so you won’t need to repaint the wall. Use a level and draw a very light pencil line where you want the top of the shelf to be. The shelf will hide the line. Use “delicate surface” masking tape to avoid any possibility of messing up the paint. Locate the studs and mark the centers on the tape. Electronic stud finders are the go-to tool for this task. Now you can plan your shelf-mounting project to hit as many studs as possible and use the tape as a guide for leveling and attaching the shelf.
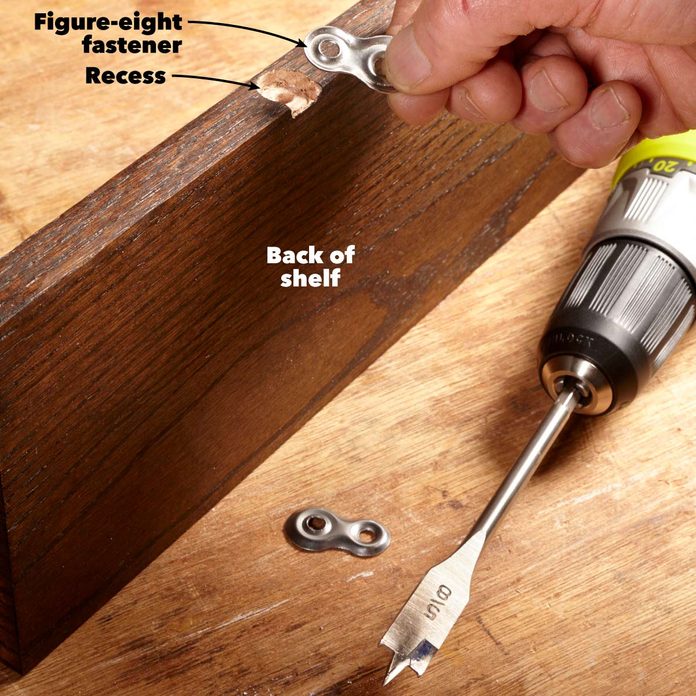
These nifty little fasteners are a handy solution for hanging shelves. You can buy a pack of eight online.
The only caveat is that the top of the figure-eight shows above the surface of the shelf, so it may be visible if you hang the shelf low. Try to position the figure-eights where there are studs if possible. You can use good-quality hollow-wall anchors for hanging wood shelves if the studs don’t line up with the figure eights.
Use a spade bit or Forstner bit to drill a slight recess in the back of the shelf to accommodate the thickness of the figure-eight. Then chisel out the remaining wood until the figure-eight sits flush with the shelf. Attach the figure-eight with a screw.
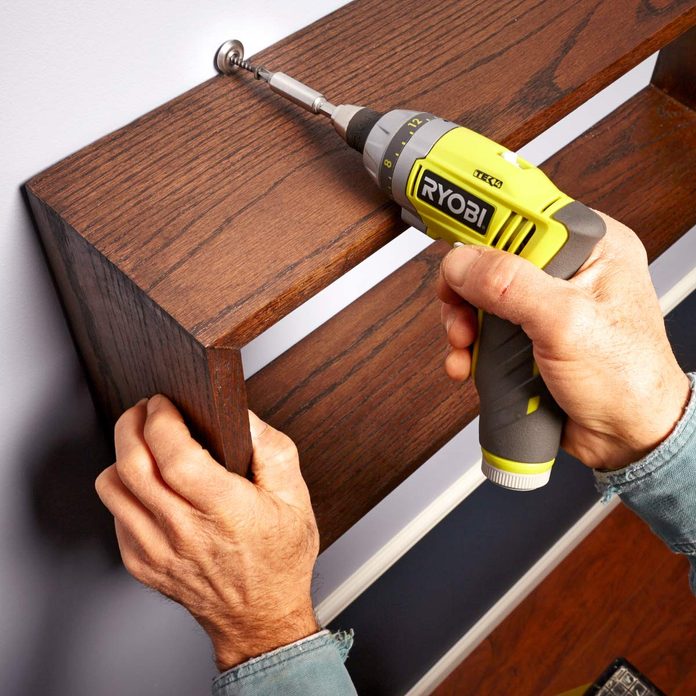
Hang the shelf by driving screws through the figure eights either into hollow-wall anchors or into studs.
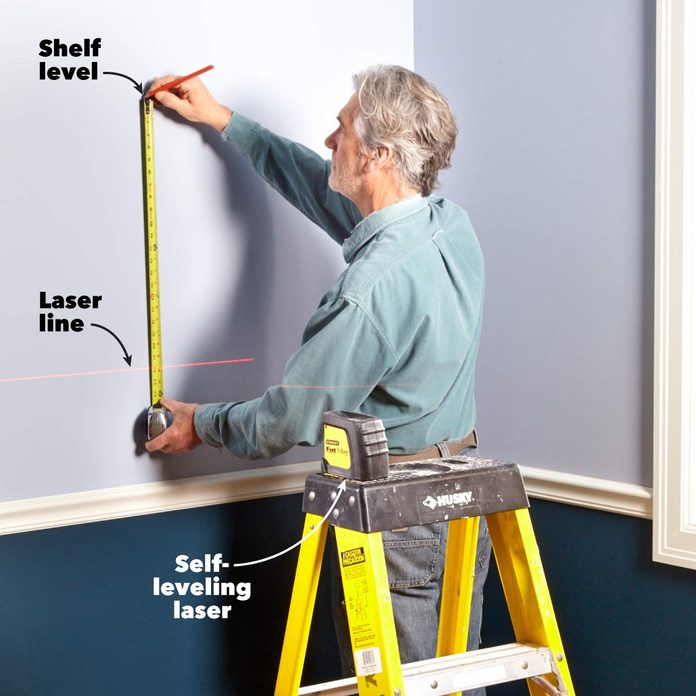
Got a lot of different types of shelves to level? A laser level is a perfect tool. We normally use a self-leveling laser, but any laser that projects a horizontal level line will work. The tip is that you don’t have to mess with getting the laser line at the height of your shelf. Just project it anywhere on the wall, and use it as a reference by measuring up from the line.
You can pick up a decent, inexpensive self-leveling laser online. Then you’ll have it for any other interior leveling tasks.
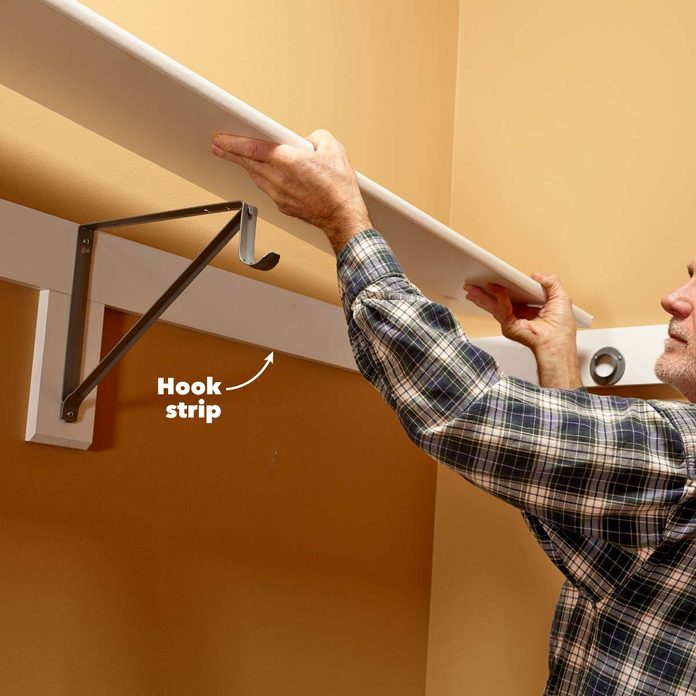
Here’s a fast, strong and easy way to hang closet shelves. Paint a 1×4 to match your shelf. Then draw a level line and locate the studs. Nail the 1×4 to the studs with 8d finish nails. Run the strip across the back and ends of the closet and put blocks in the locations where you want brackets. Now you have solid wood to attach the shelf mounting brackets and the closet pole sockets to, and the back of the shelf is fully supported to prevent sagging.
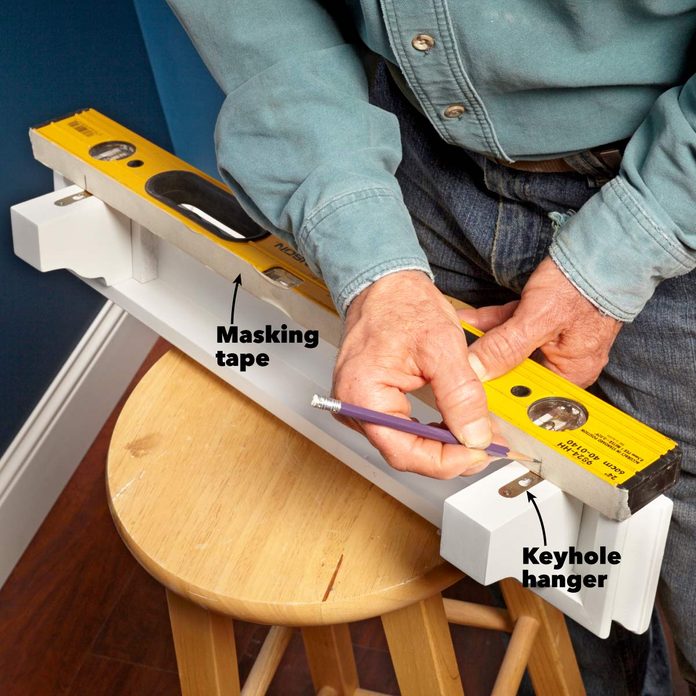
Keyhole slots on the back of shelves are a common way to hang shelves or shelf mounting brackets on hidden screws, but you have to get the screws perfectly aligned or you’ll have all kinds of trouble.
Here’s one foolproof method for transferring a pair of keyhole locations to the wall for perfect screw placement. If you’re lucky, you may be able to line up the screw locations with studs. Otherwise, use this method to mark the center of the hollow-wall anchors you’ll need.
Place a strip of masking tape on one edge of your level and mark the center of each keyhole on the tape.
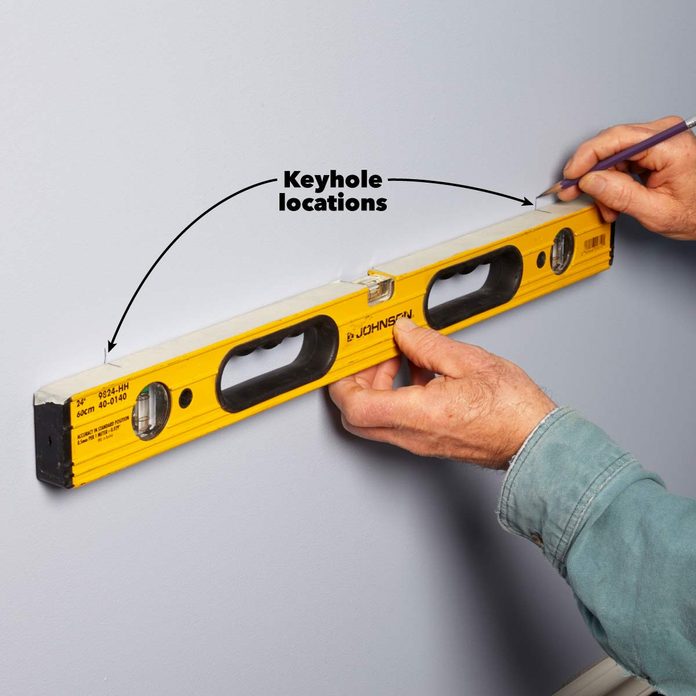
Hold the level against the wall at the height you want the shelf. Remember that the top of the shelf will be above your marks. Adjust the level until the bubble is centered, and mark the keyhole locations on the wall. Then install anchors or drive the screws into the studs and hang the shelf.

Of course, it’s always best to fasten heavy shelves to studs, but if you can’t, there’s an anchor that’s almost as good. If you’ve used standard toggle bolts, you know they hold well. But they’re a hassle to work with, and they leave an oversized hole that may show. And if you ever need to take the shelf down to paint, the toggle falls into the wall and you have to repeat the whole tedious process when you reinstall the shelf.
Snaptoggle anchors by Toggler solve these problems. After installing the toggle according to the instructions, you’ll have a threaded opening in the wall ready to receive the included bolt. You can simply screw the shelf to the captured toggle. And you can remove the bolt and the toggle will stay put, ready for you to reinstall the shelf.
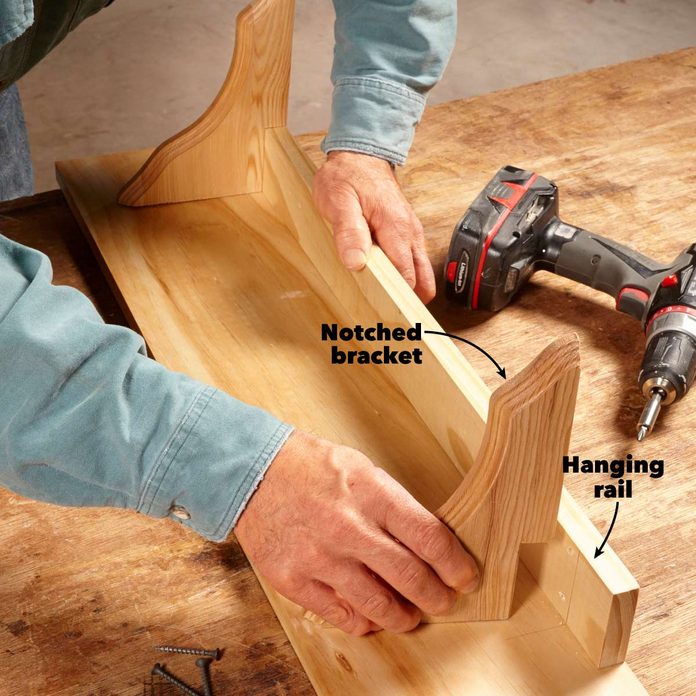
Whether you’re building a shelf or modifying a store-bought unit, including a hanging rail is a great way to add strength and allow for more flexible positioning while anchoring to studs. The rail strengthens the hanging shelf and lets you anchor the shelf by driving screws anywhere along the length of the rail.
If the hanging shelf isn’t too heavy, you can hang it with finish-head screws that are easy to hide with wood putty. For heavier shelves, drill recesses for wood plugs to hide the screws.
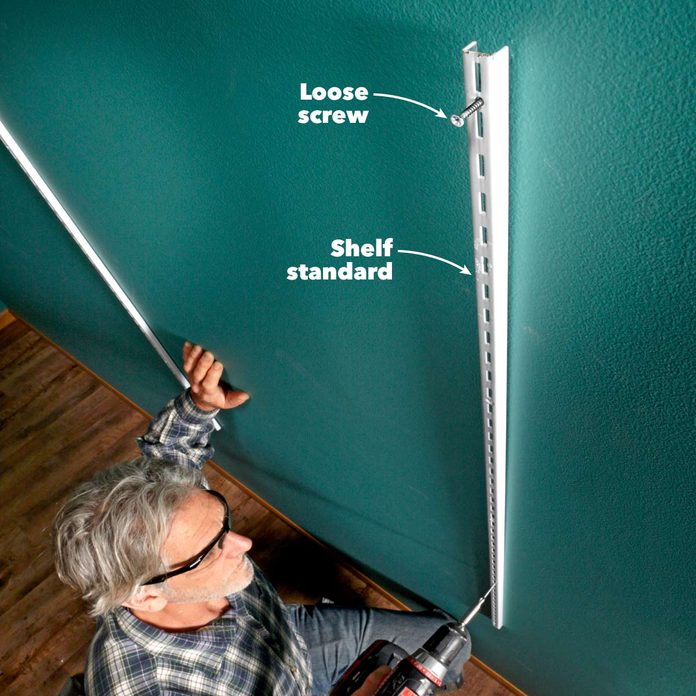
The next time you install metal shelf standards for easy-to-install shelves, remember this tip. Rather than use a level to plumb the standards before you attach them, simply hang them loosely from the top with one of the screws and let gravity do the work.
The standard will hang plumb, and all you have to do is press it to the wall and drive in the remaining screws. If you’re using hollow-wall anchors, hang the standard from the top screw and use an awl to mark the screw locations. Then take the standard down and install the anchors.
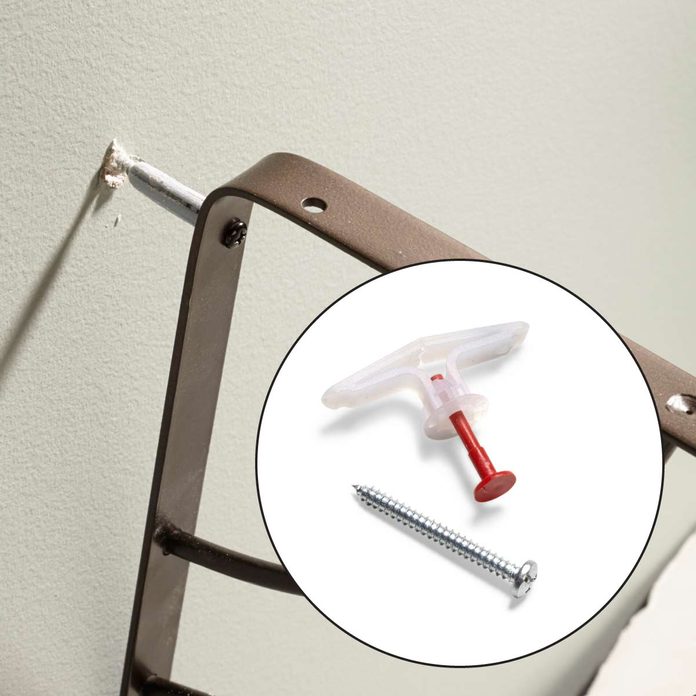
Most of the hollow-wall anchors included with shelves or shelf brackets aren’t worth using. If you can’t attach your shelf to studs and must use hollow-wall anchors, make sure to choose one that will support your shelf in the long run. Make sure you know how thick your drywall or plaster is before you head to the store. Then match the anchor to the wall thickness.
To install the anchors, check the instructions and drill the right size hole. Then fold the wings so the anchor will fit and press it into the hole. You may have to tap it with a hammer until it’s fully seated. Finish by pressing the included red tool through the hole to expand the wings behind the drywall or plaster. And make sure to use the screws included with the anchors, or ones that are the same diameter.
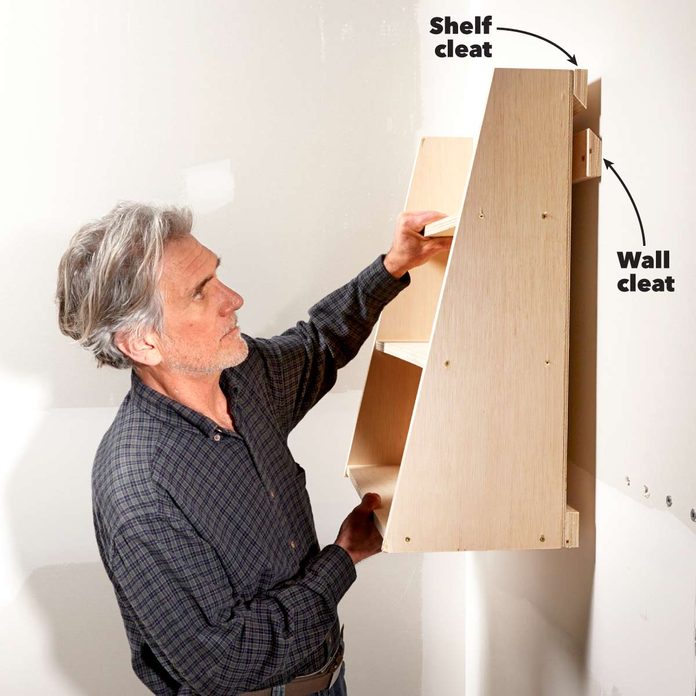
Pairs of beveled strips that interlock to support hanging kitchen shelves, cabinets or pictures are called French cleats. They’re great for hanging any shelf or cabinet and have a few advantages in certain situations.
First, the cleats work well for heavy cabinets because you can easily mount the wall cleat and then simply lift the cabinet and “hook” it on. There’s no need to support a heavy cabinet temporarily while you drive screws to anchor it.
Another common use for French cleats is to create a flexible system of shelves or cabinets. You can screw one or more lengths of wall cleats across the entire wall, then easily relocate shelves, or add more shelves at a later date. Make cleats by ripping strips of 3/4-in. plywood with a 45-degree bevel on one edge. Screw one strip to the wall and the other to the back of the shelf or cabinet.