


After you've walked past those annoying sights in your home often enough, they become your new "normal." But you can fix the yellowed handles on your bright white refrigerator, the nicks and gouges in your coffee table, that messy web of electronics cords under your TV and the dings and dents in your walls. We've rounded up 14 common annoying sights and come up with the best DIY fixes to make them right with little effort and minimal cost.
The 14 Best Fixes For Annoying Sights in Your Home
1
/
14
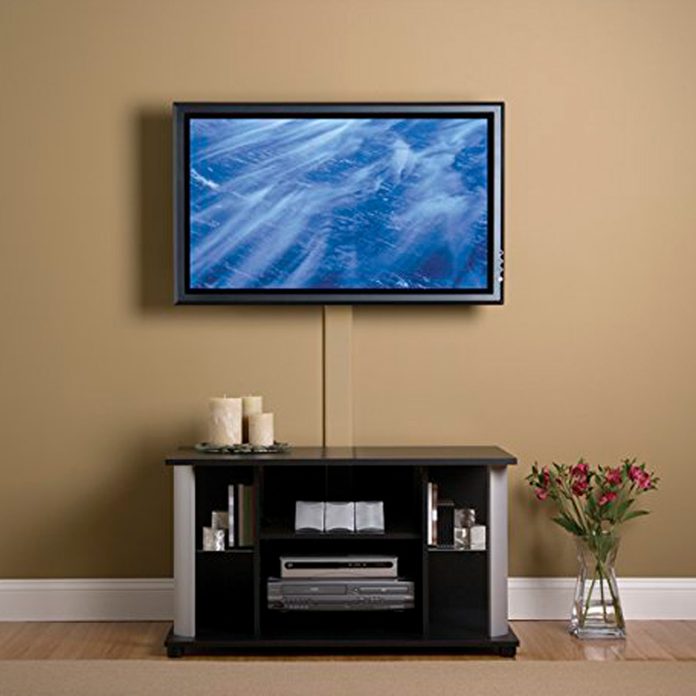
Hide TV cords
Wall hung TVs are supposed to look clean and neat. But the power cord, coaxial cable and sound cables mess up the wall big-time. What’s the best fix? An inexpensive cord cover kit! Secure the back portion to the wall with screws or adhesive strips. Lay the cables in place and snap on the cover. Paint to match the wall and you’re done. Here’s a completely DIY cord concealer.
2
/
14
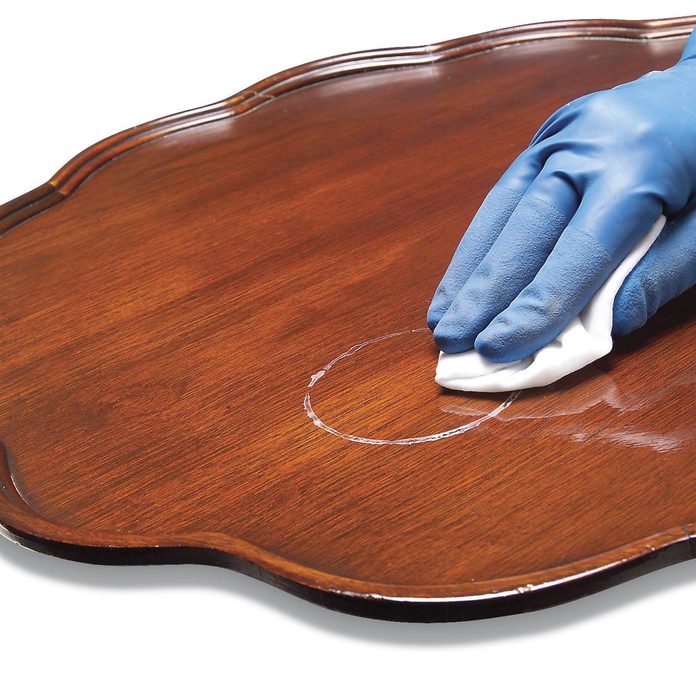
Remove water stains from wood furniture
There’s no single best fix for removing water stains from your wood furniture.That’s because all wood types and finishes react differently. So, you may have to try each of these until you find the best fix for your water stains. Start by mixing 1 tablespoon baking soda with 1 teaspoon water to make a paste. Rub the paste into the water spot using a soft cloth. Then wipe. If that doesn’t work, mix equal parts of vinegar and olive oil and rub that into the grain. For really stubborn stains, apply a thin layer of petroleum jelly to the area and let it sit overnight. Wipe it off the next morning. Got a wobbly chair? Here’s how to fix it.
3
/
14
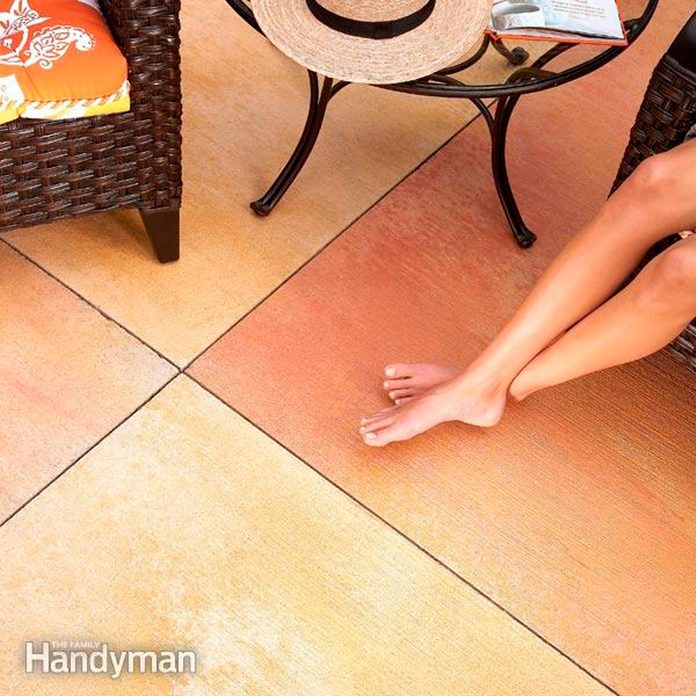
Stain ugly, boring concrete
Put some pizzazz into your boring gray patio with concrete stain. The materials cost about $100 and the entire project takes just a few hours over a two-day period. Start by cleaning the patio with concrete cleaner and a stiff broom. Use a heavy-duty degreaser to remove oil or grease stains and a concrete rust remover product to remove hard water rust marks. Rinse off the cleaner. Wait for an overcast 2-day period with no rain. Dampen the concrete with a mist from a garden hose. Then apply the stain with a pump sprayer. Let it dry overnight. Then apply a concrete sealer the next day. Let that dry and enjoy your new patio. Learn how to do multi-color concrete staining.
4
/
14
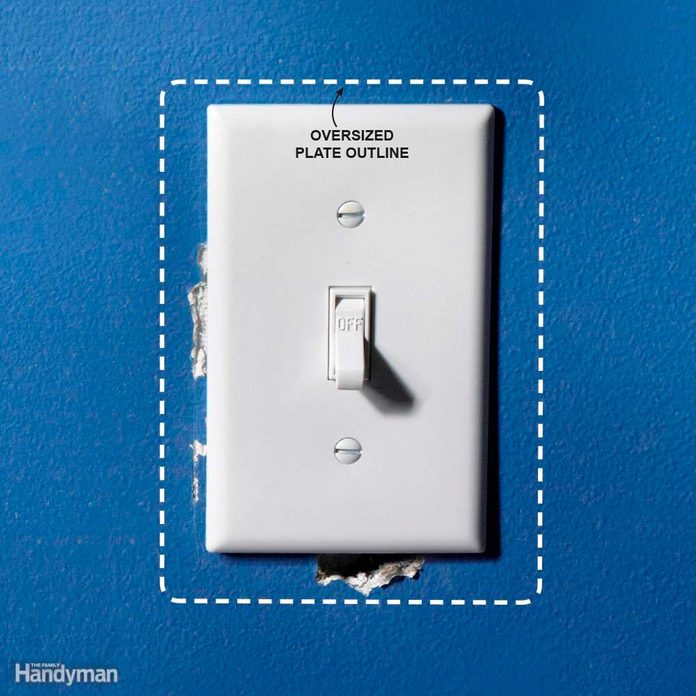
Fix an ugly oversize drywall cutout
This happens a lot. You’re adding an outlet or switch and you cut the drywall opening a bit too large for the electrical box. Don’t waste time and energy filling in the gap with joint compound. The best fix is an oversize cover plate. Slap it on and screw it in place. No more annoying gap. Here’s the best way to cut holes in drywall.
5
/
14

Replace torn storm door screen
Torn screen looks terrible and is an open invitation to mosquitoes and bugs of all kinds. You can replace the entire screen in about an hour with new screen fabric, spline and an inexpensive screen roller. It’s really an easy fix! Pull out the old spline and screen and take the spline with you to the home center or hardware store and buy the same type. Lay the new screen in the door and cut to size, leaving a 2-inch overhang all around. Press the spline and screen fabric into the gap along two side. Then place a brick or other heavy object in the middle of the screen. That’ll prevent over-stretching the fabric. Finish by forcing the spline into the remaining gap with the spline tool. Use a utility knife to trim off the excess screen fabric. Here are more details on replacing screens.
6
/
14
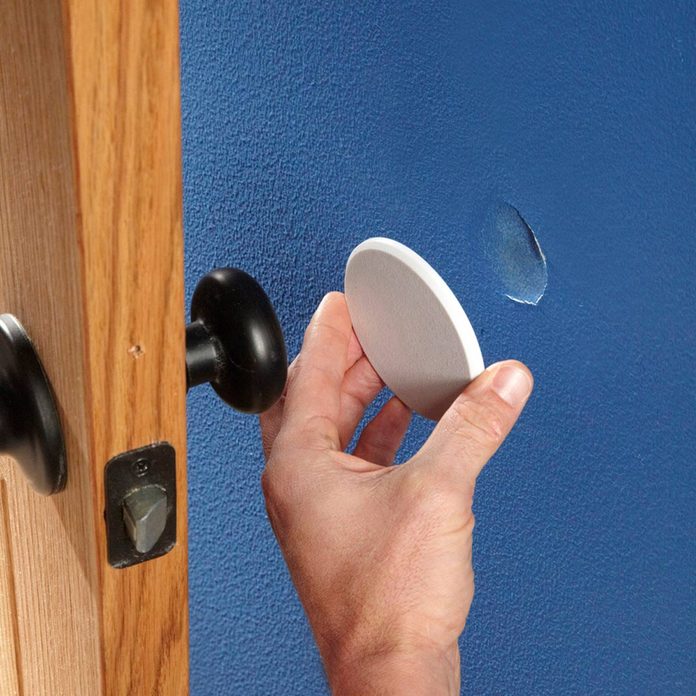
Door knob divot
You should have replaced that door stop long ago and now you’ve got a nice round divot in the drywall from the door knob. Grab the patching compound and fill it? Nope, too much work. Buy an inexpensive stick-on bumper and slap it over the crater. It’s the best fix for the job. Here are 11 clever tricks for repairing walls and ceilings.
7
/
14
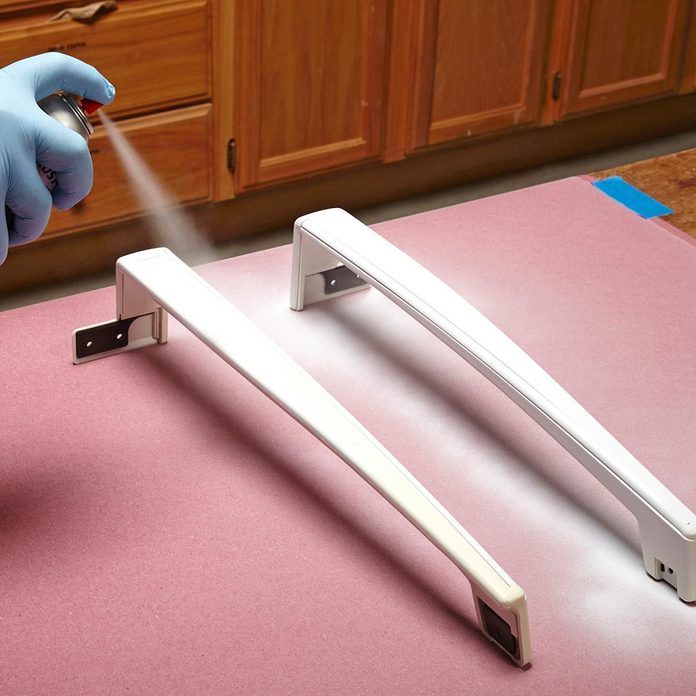
Paint discolored appliance handles
Over time and with use the plastic handles on your refrigerator, dishwasher and range change color, usually from bright white to dingy yellow. Bring them back to life with a new coat of paint. Just remove the components, scrub them down with degreaser and hot water and let them air dry. Mask off manufacturer logos with painter’s tape and spray them with paint designed specifically for plastic parts. Apply several light coats, following the suggested drying time between coats. Then, finish with a layer of clear coat. Here’s how to remove appliance handles and more on painting them.
8
/
14
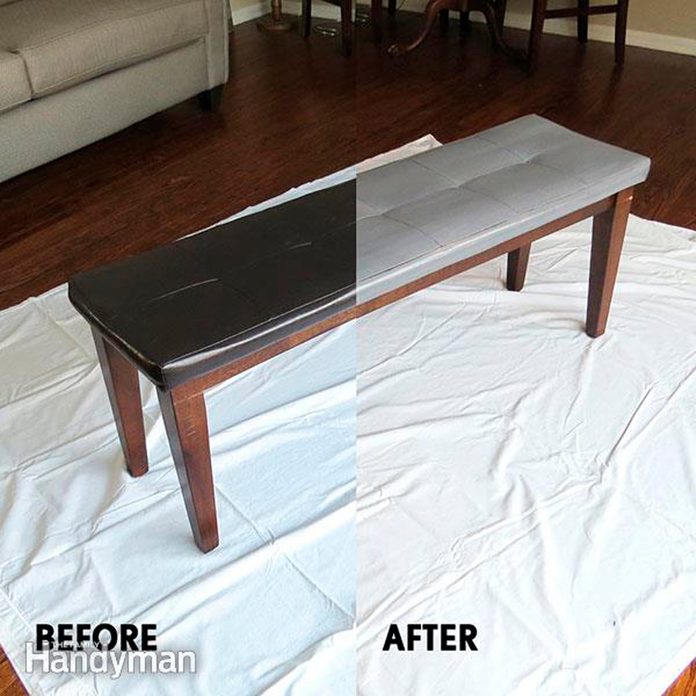
Paint old leather furniture
Here’s a surprising fix for old, unsightly leather furniture—paint it. Yes, you can paint leather! It’ll take some prep work to clean the old leather and prepare the surface to accept the paint, but you’ll wind up with a brand new look. You’ll need a leather preparer and deglazer solution, leather paint and leather finisher, in either gloss or matte finish, as the final step.
Buy leather preparer and deglazer solution now on Amazon.
9
/
14
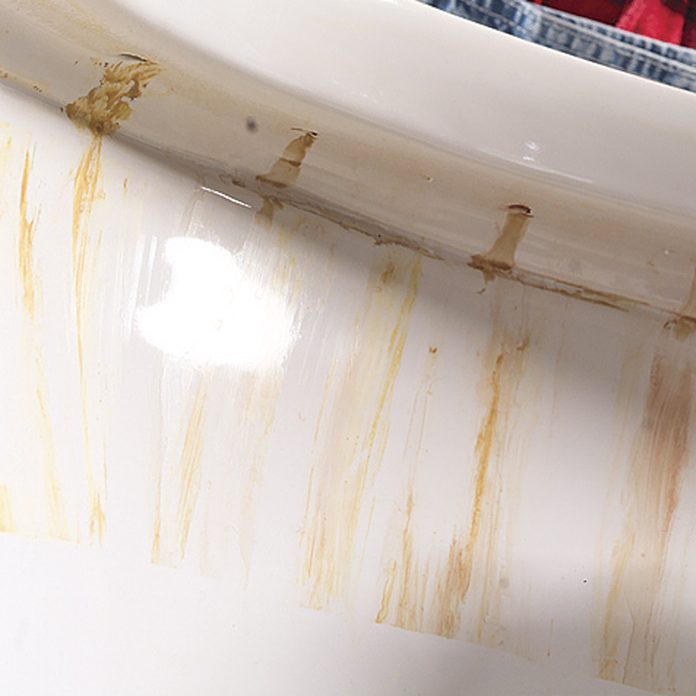
Remove rust stains from porcelain plumbing fixtures
Hard water can leave ugly red rust stains in your toilet bowl and sinks. Don’t waste time and energy trying to scrub them off. That’s simply too much work. Spraying the stains with a hard water rust stain remover is the best fix. Turn off the water supply to the toilet and empty the bowl with a wet/dry vacuum. Dry off the porcelain and spray the stains with the hard water rust stain remover. Once the stains are gone, buy a rust remover additive and add it to your water softener to prevent new stains from forming. If your problem is rust stains on concrete, here’s how to remove them.
10
/
14
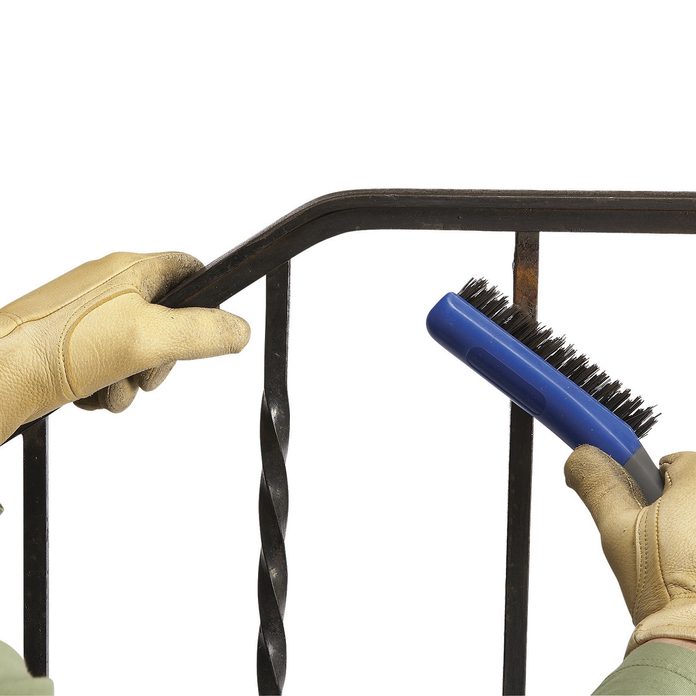
Repaint rusty metal railings
All metal railings rust eventually. Don’t just spray paint over the rusted areas because it won’t last. Instead, follow this four-step process. Use a wire brush to remove the peeling paint and surface rust. Spray the rusted areas and bare metal with a rust “reformer” to prevent the rust from spreading. Then spray the entire railing with a zinc-enhanced exterior spray paint. Wait the recommended drying time and finish with a spray-on clear coat. Repainting using all four steps is the best fix for an unsightly railing. Here are complete instructions for installing a outdoor stair railing.
11
/
14
Paint an ugly door
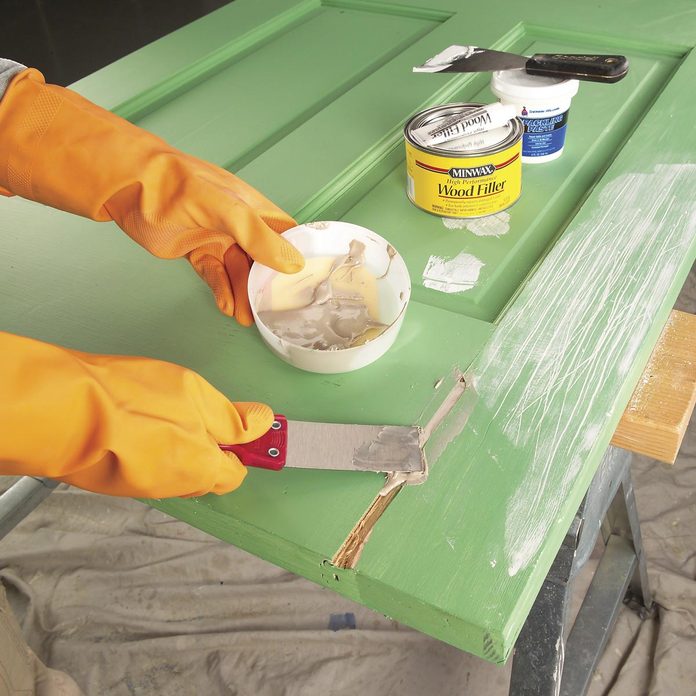
Doors get dinged and dirty but you can refresh them easily with some wood filler and a new coat of paint. But, like any painting project, surface prep is very important. Start by cleaning the door with a degreasing cleaner. Rinse with a damp rag. If the door had a gloss finish, apply a deglosser. Patch dings and holes with wood filler. Then, sand with 220-grit sandpaper. Apply a stain-blocking sealer/primer. Let it dry. Then apply the new paint using a mini roller and brush. Here’s a collection of tips for painting doors.
12
/
14

Patch a textured wall
If you’ve got a damaged spot on your textured walls, the best fix involves a patch, prime, retexture and repaint. Patching the gouge or hole is the easiest part. It’s matching the texture that’s a bit more difficult. But, you don’t have to hire a pro. Once you finish the patch, prime the repair. Then buy a can of professional-grade wall texture spray and practice on some cardboard. The professional version has an adjustable nozzle to help you match the texture already on your wall, so it’s worth the extra cost. Once you have the knack for it, apply the spray texture to the wall. If you like the look of textured walls, here’s how to apply texture yourself.
If you have textured ceilings and you want to get rid of them. here’s how.
13
/
14
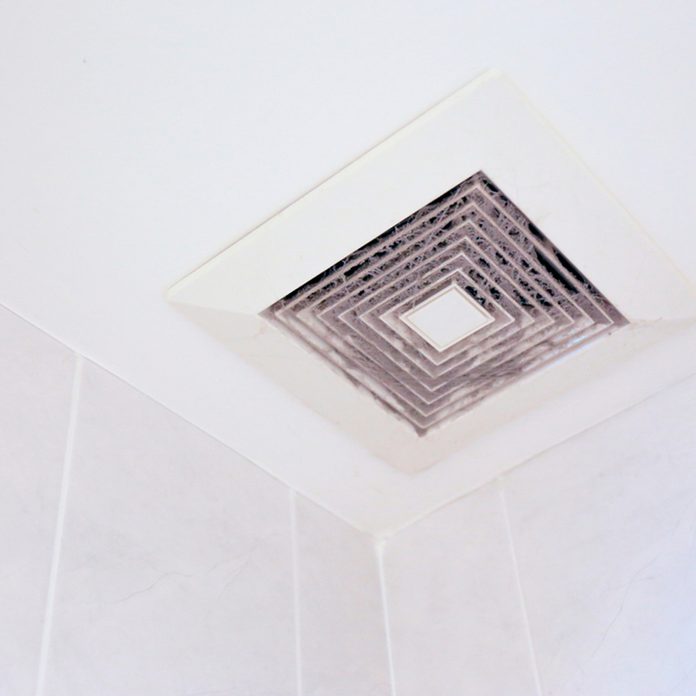
Clean a dirty bath fan grille
Cleaning an unsightly bath fan grille is easier than you think. Most of them pull straight down from the ceiling and detach by squeezing two spring clips. Remove yours and spray it with a household cleaner/degreaser. Then rinse it with hot water. Wipe off any remaining dirt with a soft cloth. Compress the spring clips and pop it back in place. Is your bathroom fan noisy? Here’s how to fix that!
14
/
14
Clean ceiling fan blades
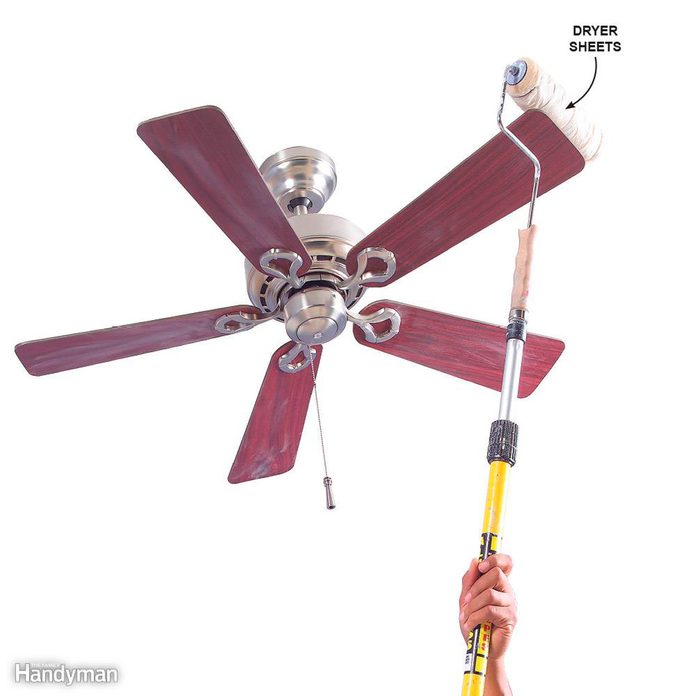
Nobody notices all the dust buildup on your ceiling fan blades when it’s spinning, but it’s pretty obvious once you turn it off. The good news is, you don’t have to grab a ladder to clean the blades. Just wrap a dryer sheet around a paint roller and tape the end. Screw it onto a paint pole and roll it across the front and back sides of the blades. It’s quick fix for dusty ceiling fan blades. Here are13 great tips to help you clean your house fast.
Every product is independently selected by our editors. If you buy something through our links, we may earn an affiliate commission.